Exercises with basic Linux commands
Contents
1. Exercises with basic Linux commands
1.1. Winlab servers
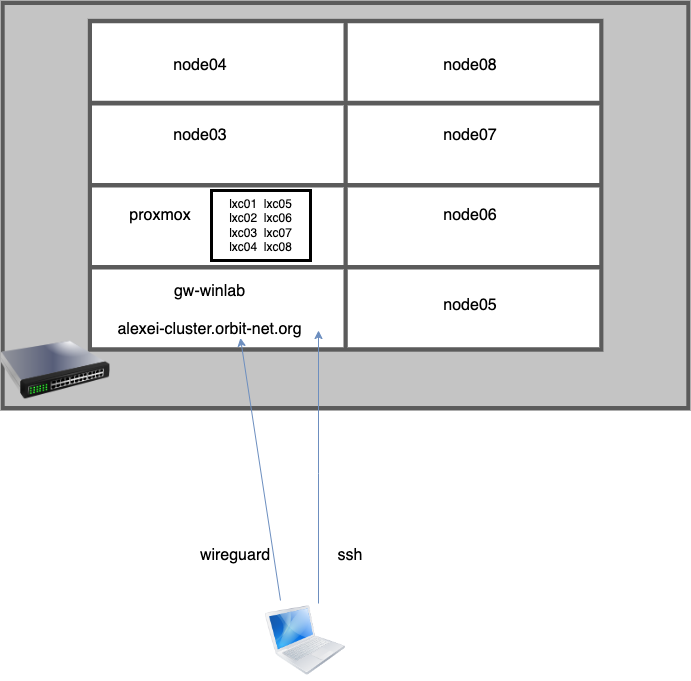
1.2. ssh to your server container as user hostadm
For example, ssh to lxc10:
ssh hostadm@lxc10
or you can go by the IP address:
ssh hostadm@192.168.5.110
1.3. Exercise to create user account mike on the lxc container.
Become root:
sudo -s
Create a new user account, mike:
adduser mike
Verify the account existence:
id mike
Change password of the user:
passwd mike
1.4. File Permissions and Ownerships
1.4.1. Permissions
Octal |
Binary |
Permission |
Meaning |
|---|---|---|---|
0 |
000 |
none |
All turned off |
1 |
001 |
–x |
Execute |
2 |
010 |
-w- |
Write |
3 |
011 |
-wx |
Write, execute |
4 |
100 |
r– |
Read |
5 |
101 |
r-x |
Read, execute |
6 |
110 |
rw- |
Read, write |
7 |
111 |
rwx |
Read, write, execute |
1.4.2. File Ownerships: USER (u), GROUP (g), OTHERS (o)
Changing permissions Permissions are applied for USER, GROUP and OTHERS (rwx rwx rwx)
su - mike
cp /etc/group  testf.txt
chmod 660 testf.txt
ls -l  testf.txt
-rw-rw---- 1 mike mike 0 Jan 18 10:26 testf.txt
1.5. Assigning permissions and ownerships on files (Exercise)
Create a new directory EX1 and step into it:
mkdir EX1
cd EX1
Check umask and create a new file, mf1.txt. See the file attributes with command ls.
umask
touch mf1.txt
ls -l mf1.txt
Change umask and create anothe file, mf2.txt
umask 022
touch mf2.txt
ls -l mf2.txt
Create another file, mf3.exe and make it executable:
touch mf3.exe
chmod 755 mf3.exe
ls -l mf3.exe
Try runing files mf2.txt and mf3.exe, and see which one is runnable:
./mf2.txt
./mf3.exe
As you can see only the executable file can run.
Changing the user ownership on file mf1.txt:
sudo chown mike mf1.txt
ls -l mf1.txt
Note, you need to be the root user when changing the file ownership.
Changing the group ownership on file mf2.txt:
sudo chown :mike mf2.txt
ls -l mf2.txt
Changing both the user and group ownership on file mf3.exe:
sudo chown mike:mike mf3.exe
ls -l mf*
1.6. Commands for directory manipulation (exercise)
When you login into the system, you automatically get into your home directory
#1. Determine the directory you are in:
pwd
#2. Go to some other directory, for example, /etc:
cd /etc
#3. Go to your home directory:
cd $HOME
or
cd ~
#4. Go back-and-forth between directories and check where you are:
cd /etc
pwd
cd -
pwd
cd -
pwd
#5. Create a new directory above your home directory:
mkdir Newdir
#6. Go to the new directory and check where you are:
cd Newdir
pwd
#7. Go one step back to the parent directory and check where you are:
cd ..
pwd
#8. Remove the new directory:
rmdir Newdir
#9. Create a new directory above your home directory with subdirectories. Try the following:
mkdir Newdir/one/two/three
Does it work? Try the following:
mkdir -p Newdir/one/two/three
#10. Create a few files in Newdir/one:
cd Newdir/one; touch f1.t; touch f2.t; touch f3.t
#11. Go back into the original directory and try to delete Newdir:
cd -
rmdir Newdir
Does it work ? Try the following:
rm -R Newdir
#12. Repeat step #9; Copy the directory with its tree into another directory:
cp -dpR Newdir Newdir-1
same as
cp -a Newdir Newdir-1
1.7. Commands to read text file content (exercise)
#13. Show content of file /etc/hosts
cat /etc/hosts
tac /etc/hosts
less /etc/hosts
#14. Show the first and last 10 lines of a file
head -n 10 /etc/nsswitch.conf
tail -n 10 /etc/nsswitch.conf
1.8. Various important commands (exercise)
#15. Show date on the system clock
date
#16. File system usage
df -h
#17. Disk usage
du -h /home
du -s /home
du --max-depth=1 /var
#18. Display data
echo $[10*3+2]
echo '$[10*3+2]'
echo "$[10*3+2]"
#19. Determine file type
file /bin/ls
file /etc/hosts
#20. Who is logined to the system
who
#21. The owner of the current shell
whoami
#22. Getting information about a file or command, for example netstat
whatis netstat
man netstat
#23. Compressing/uncompressing files with gzip, and bzip2:
cd ~
cp /etc/hosts  hosts.txt
gzip hosts.txt
ls -l
less hosts.txt.gz
more hosts.txt.gz
zcat hosts.txt.gz
gunzip hosts.txt.gz
bzip2 hosts.txt
bzip2 -d hosts.txt.bz2
#24. Searching for files by using command find
cd /tmp
mkdir newfiles; cd newfiles
touch fff.txt
cd ~
find / -name fff.txt
cd /tmp
find . -name fff.txt
find . -name '*ff*'
find /tmp -name fff.txt -exec rm '{}' ';'
find /var -size +1000k
find /var -size +1000000c
find /home -user hostadm
find /var -mtime -5
find /var -maxdepth 2 -mtime -20
#25. Searching for system files
which dpkg
whereis dpkg
locate dpkg
#26. Using tar-gzip to archive a directory. Create a new directory with subdirectories above your home directory, then tar and gzip it. For example,
mkdir -p Newdir/one/two/three
cd Newdir/one/two
cp /etc/hosts .
cd three
cp /etc/passwd .
cd ~
tar -cvf Newdir.tar Newdir
gzip Newdir.tar
ls -l Newdir.tar.gz
rm -R Newdir
cp Newdir.tar.gz /tmp
cd /tmp
gunzip Newdir.tar.gz
tar -xvf Newdir.tar
#27. To tar and gzip file with one command, try the following:
tar -zcvf Newdir.tgz Newdir
rm -R Newdir
ls -l Newdir.tgz
tar -zxvf Newdir.tgz
#28. Archive/restore from input file list by cpio command:
cd /etc
find . | cpio -ov  > /tmp/etc.cpio
mkdir /tmp/RESTORE
cd /tmp/RESTORE
cpio -iv < ../etc.cpio
#29. Command history in bash shell:
history
Find a command in the history by the regular expression in its name:
ctrl + R
then type the string contained in the command.
#30. Command history file .bash_history is updated when a user exits the shell.
tail .bash_history
The size or file .bash_history is defined by env variable HISTSIZE
echo $HISTSIZE
#31. Commands to read hardware information. CPU info:
lscpu
PCI device info:
lspci
Install package lshw:
apt install lshw
Use command lshw for querying hardware info below.
Memory info:
lshw -class memory
Storage controller:
lshw -class storage
Disks:
lshw -class disk
Network interfaces:
lshw -class network
Video card and display info:
lshw -class video