Virtualization
Contents
2. Virtualization
Introduction to operating system virtualization
Virtualization types
KVM virtualization
VM CLI management tool: virsh
VM deployment
VM cloning
VM removal
Virtual drive access
VM appliance deployment
References:
KVM and QEMU. (Explains well how the KVM module and QEMU work together)
2.1. What is virtualization
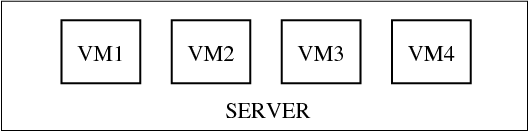
In computing, a virtualization is the facility that allows multiple operating systems (VMs) to run simultaneously on a computer in a safe and efficient manner.
Virtualization purposes:
Application development and testing on a separate system,
Server consolidation on one platform,
Virtual appliances (download a VM applience for specific application or service)
Prototyping and setting VMs to run on a remote server or/and cloud.
Multiple Operating systems on a desktop.
2.2. Original Virtualization challenges on x86
The virtualization implies sharing of CPU, RAM and I/O between the virtual machines (VMs). The traditional x86 platform was not designed for this.
CPU virtualization challenges: how to share the privileged mode (Ring 0)?
Memory virtualization challenges involve sharing the physical system memory and dynamically allocating it to virtual machines.
Device and I/O virtualization involves managing the routing of I/O requests between virtual devices and the shared physical hardware.
2.3. Virtualization types on x86 platform
Operating system virtualization. The system runs with a single Kernel; applications run within ‘containers’ like on different operating systems. Example: Solaris zones, LXC linux containers, Linux OpenVZ, Docker containers.
Hardware Emulation (Full virtualization). A hypervisor presents an emulated hardware to unmodified guest operating systems. Example: VMware desktop/server, VirtualBox, QEMU.
Paravirtualization. A hypervisor multiplexes access to hardware by modified guest operating systems. Example: Xen.
A hardware assist virtualization on re-designed x86 platforms, such as AMD-V and Intel-VT. Example: KVM, VirtualBox, VMware ESX, Hyper-V
2.4. Virtualization with KVM
QEMU alone can provide full hardware emulation and system call trapping (Full virtualization).
QEMU + KVM (Kernel Virtual Machine module) is a full virtualization solution for Linux on x86 hardware containing virtualization extensions (Intel VT or AMD-V).
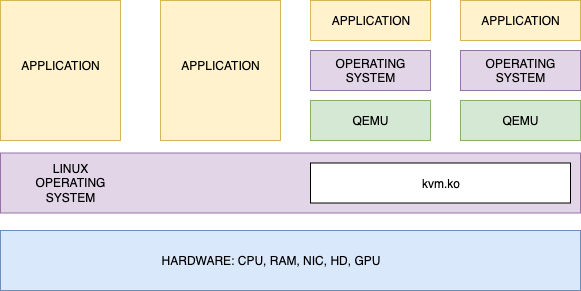
A virtual machine (VM) essentially consists of two parts:
XML configuration file:
/etc/libvirt/qemu/vm.xmlDisk partition or image file, by default:
/var/lib/libvirt/images/vm.qcow2
To see if the processor supports hardware virtualization:
egrep -c '(vmx|svm)' /proc/cpuinfo
If 0 it means that your CPU doesn’t support hardware virtualization.
If 1 or more it does - but you still need to make sure that virtualization is enabled in the BIOS.
Verify that the BIOS has virtualization enabled
  sudo apt-get install cpu-checker
  kvm-ok
If it shows
INFO: Your CPU supports KVM extensions
INFO: KVM is disabled by your BIOS
the Intel Virtualization Technology needs to be enabled in the BIOS. On the other hand, if you see the outbut below, the Intel-VT is enabled.
INFO: Your CPU supports KVM extensions
INFO: /dev/kvm exists
KVM acceleration can be used
2.5. KVM setup (Exercise)
Install KVM virtual director:
sudo -s
apt-get install virt-manager
Correct the ownership of the VM image directory:
chown hostadm:hostadm /var/lib/libvirt/images
Add user hostadm to group libvirt:
usermod -a -G libvirt hostadm
Install kvm packages:
apt-get install qemu-kvm qemu-system
Restart libvirtd service:
systemctl restart libvirtd
Logout from the desktop, then login again.
2.6. Management user interface, virsh (Exercise)
Command virshis a CLI alternative to the GUI based virt-manager.
Both virsh and virt-manager are parts of libvirt programming interface (API).
virsh can be used, for example, to see the list of running VMs:
virsh -c qemu:///system list
To eliminate typing -c qemu:///system in the command option every time, we can setup environment variable,
LIBVIRT_DEFAULT_URI.
On the desktop, edit file .bashrc in the home directory of hostadm, and add the following line in the end of the file:
export LIBVIRT_DEFAULT_URI='qemu:///system'
This tells the libvirt commands what hypervisor to communicate with, specifically, qemu on the local system.
Run command
source .bashrc
Enable virtual network
virsh net-autostart default
virsh net-start default
See the virtual network status:
virsh net-list --all
2.7. Deployment of an Ubuntu 2020 appliance VM (Exercise)
Download a tar ball with Ubuntu 2020 VM, kvm1, into /tmp and extract its content:
cd /tmp
wget http://capone.rutgers.edu/coursefiles/kvm1.tgz
tar -zxvf /tmp/kvm1.tgz
Copy the xml file with VM configuration into directory /etc/libvirt/qemu as shown below; the qcow2 file with the VM root file system goes into /var/lib/libvirt/images directory.
Assign hostadm user and group ownership on the both, xml and img, files:
sudo cp kvm1.xml  /etc/libvirt/qemu
sudo mv kvm1.qcow2 /var/lib/libvirt/images
sudo chown hostadm:hostadm /etc/libvirt/qemu/kvm1.xml
sudo chown hostadm:hostadm /var/lib/libvirt/images/kvm1.qcow2
To conserve space on your desktop, remove the kvm1 tarball:
rm /tmp/kvm1.tgz
Define the new VM configuration in KVM:
sudo virsh define /etc/libvirt/qemu/kvm1.xml
Start the new VM:
virsh start kvm1
Login to the new VM console as user hostadm with password unisys:
virsh console kvm1
Shutdown rocky with console command:
shutdown -h now
2.8. Basic virsh commands (Exercise)
See the list of running VMs:
virsh list
List of all the VMs:
virsh list --all
Start a VM, kvm1 for example:
virsh start kvm1
Shutdown the VM through virsh
virsh shutdown kvm1
Verify that it is down
virsh list --all
Start the VM again
virsh start kvm1
To find out the IP address of the running VM:
virsh domifaddr kvm1
Login to the VM console from the desktop terminal by using command virsh:
virsh console kvm1
To exit from the console, press
^]
2.9. Cloning VMs with virt-clone (Exercise)
Create a new directory, KVM, for storing new VM qcow2 files:
mkdir KVM
Clone kvm1 to a new VM host, kvm3, by executing the command below:
virt-clone -o kvm1 -n kvm3 -f /home/hostadm/KVM/kvm3.qcow2
Check if the new VM is in the list, start it, then login to its console:
virsh list --all
virsh start kvm3
virsh console kvm3
Fix the host name: Login to the system as user hostadm, elevate privileges by running
sudo -s
To change the host name from kvm1 to kvm3,
edit file /etc/hostname and replace kvm1 by kvm3.
Reset the machine ID by running the following commands on kvm3:
./vm_id_reset.sh
Reboot the VM:
reboot
It should come up with the correct hostname and IP address.
2.10. Accessing the virtual drive of a VM (Exercise)
If a VM fails to boot for some reason, you may need to access the virtual drive, analyse the system logs, and fix the configuration. Below is the procedure how to mount the qcow2 disk image.
Shutdown kvm3
virsh shutdown kvm3
Load nbd kernel module for two partitions. It allows to create a mountable block device from the qcow2 file:
sudo -s
cd KVM
modprobe nbd max_part=2
qemu-nbd --connect=/dev/nbd0 /home/hostadm/KVM/kvm3.qcow2
Create a mounting point, /mnt/vm, and mount the root partition of the drive:
mkdir -p /mnt/vm
fdisk /dev/nbd0 -l
mount /dev/nbd0p2 /mnt/vm
Now you should be able to access the virtual drive content in directory /mnt/vm
cd /mnt/vm
ls
cat etc/hostname
Unmount and disconnect the drive:
cd
umount /mnt/vm
qemu-nbd --disconnect /dev/nbd0
2.11. Delete VM kvm3 (Exercise)
To delete a VM, you need, first, to shutdown the VM, then run command virsh undefine for the VM:
virsh undefine kvm3
Now you can delete the VM disk images:
rm KVM/kvm3.qcow2
Check what other VMs are registered with your hypervisor:
virsh list --all
2.12. Deployment of a Redhat appliance VM (Exercise)
Download a tar ball with rocky (aka Red Hat 8.6) VM into /tmp and extract its content:
cd /tmp
wget http://capone.rutgers.edu/coursefiles/rocky8.tgz
tar -zxvf /tmp/rocky8.tgz
Copy the xml file with VM configuration into directory /etc/libvirt/qemu as shown below; the qcow2 file with the VM root file system goes into /var/lib/libvirt/images directory.
Assign hostadm user and group ownership on the both, xml and img, files:
sudo cp rocky8.xml  /etc/libvirt/qemu
sudo mv rocky8.qcow2 /var/lib/libvirt/images
sudo chown hostadm:hostadm /etc/libvirt/qemu/rocky8.xml
sudo chown hostadm:hostadm /var/lib/libvirt/images/rocky8.qcow2
Define the new VM configuration in KVM:
sudo virsh define /etc/libvirt/qemu/rocky8.xml
Start the new VM:
virsh start rocky8
Login to the new VM console as user hostadm with password unisys:
virsh console rocky8
Shutdown rocky with console command:
shutdown -h now