Networking
Contents
4. Networking
4.1. Linux networking
Overview of network protocols and TCP/IP in Linux.
Network configuration in Linux.
Netplan on Ubuntu servers.
Network settings in Red Hat.
Network applications and services.
Network calculation with ipcalc
4.2. Computers on the intertnet
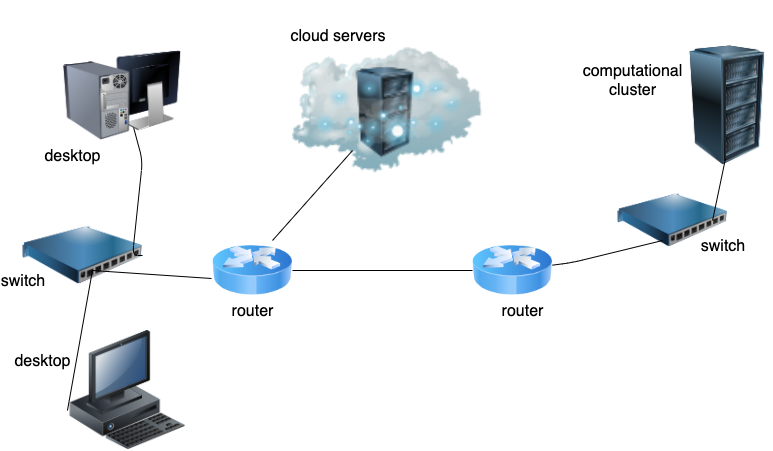
Network communication allows sending information, transfering files, and managing applications remotely between computers.
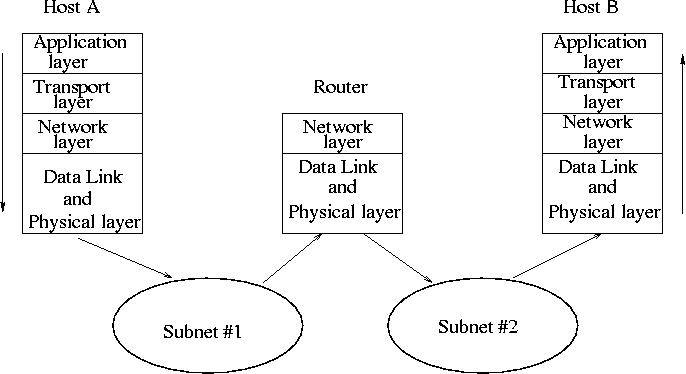
Networks are organized in a series of layers implemented on each machine.
The layers are independent and each layer offers a specific task to the neighboring layers above and below.
The communication between the layers is based on defined rules and procedures, called protocols.
Data is processed and passed through the layers from above to below, until the bottom layer is reached.
At the bottom layer, computers communicate with each other via sending and receiving network datagrams through - cables, switches and routers.
4.3. TCP/IP 5 layer protocol suit
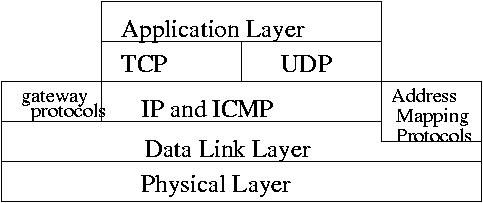
Each layer has its own task:
TCP/IP Protocol Layer |
Tasks |
|---|---|
5. Application Layer: ssh, ftp, http … |
Data segmentation by the application into Message Transfer Unit (MTU) segments. Typical MTU is 1.5 Kbyte |
4. Transport Layer: TCP, UDP, ports |
Connection management, quality, and ports to the applications |
3. Internet Layer: IP addresses, subnets, routing |
Addressing: each computer has a unique address on its network or subnet. Routing between networks. |
2. Link Layer: Ethernet |
Communication on the local network (subnet) through a switch. Media Access Card (MAC) address unique on the subnet. For example, 48:d2:4f:f4:d:fb, should be unique within a subnet. Address Resolution Protocol (ARP) matches the IP address to MAC on the subnet. |
1. Physical Layer: NIC, hubs, switches, routers, cabling, wifi APs and cards |
Electronic devices to send and receive signals between computers. |
4.4. OSI 7 layer Network Stack Model
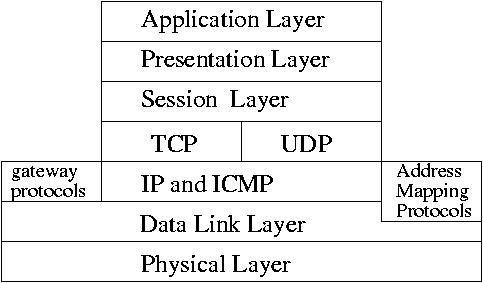
TCP/IP Protocol Layer |
Task |
|---|---|
7. Application Layer: ssh, ftp, http … |
Data segmentation by the application into Message Transfer Unit (MTU) segments. Typical MTU is 1.5 Kbyte |
6. Presentation Layer: SSL, libz, XDR |
Data encryption, compression, and encoding/decoding |
5. Session Layer: Remote Procedure Call (RPC) |
Responsible for opening, using and closing sessions. Remote procedures. |
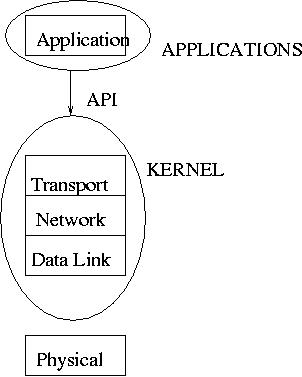
4.6. Packet Encapsulation
Data is processed in form of packet encapsulation and transmitted/received in form of Ethernet frames.

4.8. Wired connection checkup (Exercise)
To see whether your desktop is connected to a network switch and at what speed, use command
ethtool.On your desktop, install package ethtool:
apt install ethtool
See your network interfaces with command
ifconfigorip a:
/sbin/ifconfig -a
or
ip a
The main network interface, connected to the Ethernet, is enp0s3. Run command below:
/sbin/ethtool enp0s3
In the output, among various parameters, it doesn’t show Speed and Duplex because the desktop is a VM in VDI.
Speed: Unknown!
Duplex: Unknown!
Link detected: yes
If the desktop was installed on a bare metal hardware, we would see something like below:
Speed: 1000Mb/s,
Duplex: Full,
Link detected: yes
Which means the cable is connected and the link speed is 1Gb/s speed, full duplex mode.
4.9. Network IP configuration
Static configuration
IP address, gateway, and Dynamic Name Service (DNS) are configured on the host.
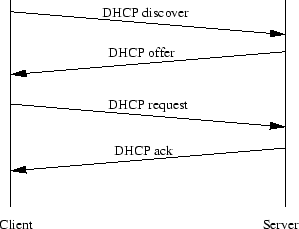
Dynamic Host Configuration Protocol (DHCP)
The settings are obtained from a DHCP server.
4.10. Environment for IP configuration on Ubuntu and RedHat
ifupdown scripts |
Network Manager service |
Netplan networkd service Meaning |
|---|---|---|
Old Debian/Ubuntu: |
Ubuntu desktop, Debian: |
Ubuntu server: |
File: |
Commands: |
File: |
RedHat: |
RedHat: |
Command: |
File: |
File: |
|
Command: |
Command: |
4.11. Deploy a new VM for exercises
Shutdown kvm1 VM, and clone it into netplan VM:
virsh shutdown kvm1
virt-clone  -o kvm1 -n netplan -f /home/hostadm/KVM/netplan.qcow2
Start netplan. Login to console of netplan:
virsh console netplan
Fix the hostname in file /etc/hostname.
Reset the machine ID by running the following script on netplan:
./vm_id_reset.sh
Execute command reboot on netplan:
reboot
4.12. Configuring network settings on Ubuntu server with Netplan (Exercises)
On netplan VM check the IP address settings by running command below:
ip addr
Assign IP address 192.168.122.222 by modifying the content of /etc/netplan/00-installer-config.yaml as follows:
network:
  version: 2
  renderer: networkd
  ethernets:
   enp1s0:
     dhcp4: no
     addresses: [192.168.122.222/24]
     gateway4: 192.168.122.1
     nameservers:
       addresses: [192.168.122.1]
Have the settings applied:
netplan apply
Check the IP address again:
ip addr
It should show 192.168.122.222 for ens3 interface now.
See the gateway settings by running command
ip route show
It should show the “default via 192.168.122.1”
4.13. Clone rocky8 VM (Exercises)
Make sure rocky8 is down:
virsh list
virsh stop rocky8
Clone rocky8 into new VM rocky:
virt-clone -o rocky8 -n rocky -f /home/hostadm/KVM/rocky.qcow2
Start the VM:
virsh start rocky
Connect to the cnsole:
virsh console rocky
Login to the system, and change the hostname in file /etc/hostname.
Reset the machine ID:
rm -f /etc/machine-id
rm /var/lib/dbus/machine-id
dbus-uuidgen --ensure=/etc/machine-id
dbus-uuidgen --ensure
Reboot the VM.
4.14. Network configurations on a Red Hat server (Exercises)
Start rocky VMs:
virsh start rocky
Login to console of rocky:
virsh console rocky
Execute command ip address show to read the IP address:
ip addr show ens3
Try pinging netplan by its IP address, for example:
ping -c 3 192.168.122.222
Become root on rocky VM
sudo -s
Install the network scripts:
dnf install network-scripts
Static IP configuration on rocky VMs.
On rocky, edit file /etc/sysconfig/network-scripts/ifcfg-ens3 and put the following settings for the static IP configuration there:
DEVICE=ens3
TYPE=Ethernet
ONBOOT=yes
BOOTPROTO=none
IPADDR=192.168.122.126
NETMASK=255.255.255.0
GATEWAY=192.168.122.1
Apply the network settings:
ifdown ens3
ifup ens3
Ping netplan by the IP address:
ping -c 3 192.168.122.222
Restore the interface settings to DHCP on rocky VMs.
On rocky, edit file /etc/sysconfig/network-scripts/ifcfg-ens3 and put the following settings for DHCP configuration:
NETWORKING=yes
DEVICE=ens3
TYPE=Ethernet
ONBOOT=yes
BOOTPROTO=dhcp
Reset the network settings:
ifdown ens3
ifup ens3
Verify the network settings:
ifconfig ens3
The interface should acquire some IP address on 192.168.122.0 network.
4.15. Internet Control Message Protocol (ICMP) protocol (Exercises)
Implemented on hosts and gateways (routers) for:
Reporting the status of datagram processing. Diagnostics of connection and routing. Reporting errors in the processing of a datagram.
Example: ping
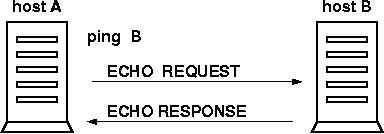
Exercise: command ping.
ping -c 5 capone.rutgers.edu
ping -c 5 engsoft.rutgers.edu
ping -c 5 google.com
If the systems respond, it means they are reachable on the network. Notice how varies the round-trip time and Time to Live (ttl) for packets between the hosts.
Example: traceroute
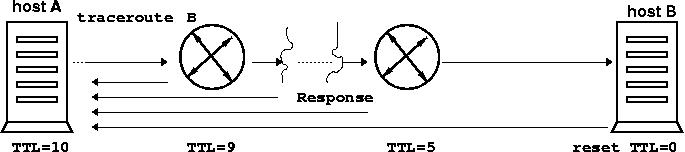
Time to leave (TTL) decrement. The TTL value of an IP packet represents the maximum number of IP routers that the packet can go through before being thrown away. You can expect each router in the Internet to decrement the TTL field by exactly one. The default TTL for traceroute on Linux is 30. It can be increased up to 255 maximum by using the -m command option.
Exercise: command traceroute.
sudo apt install traceroute
sudo /usr/sbin/traceroute -I capone.rutgers.edu
sudo /usr/sbin/traceroute -I engsoft.rutgers.edu
sudo /usr/sbin/traceroute -I google.com
This shows you all the gateways between the subnets your packet travels towards the destination. Notice the difference in the number of gateways between your desktop and the three remote hosts as well as the round trip times.
4.16. Network services (Exercises)
Make sure virtual machine netplan is running
virsh list
Figure out the IP address of netplan:
virsh domifaddr netplan
Place the IP address and netplan host name into file /etc/hosts on your desktop.
netplan IP is 192.168.122.222
nano /etc/hosts
Make entry in the file: 192.168.122.222 netplan
ssh to netplan as user hostadm:
ssh hostadm@netplan
Configure SSH for private/public key authentication. For SSH authentication, you can use either RSA or DSA public/private keys besides password. We’ll be using RSA in the exercises below. To generate an RSA key pair, type the following command at a shell prompt on your desktop:
ssh-keygen -t rsa
Accept the default file location of ~/.ssh/id_rsa. Enter a passphrase different from your account password and confirm it by entering it again.
The public key is written to ~/.ssh/id_rsa.pub. The private key is written to ~/.ssh/id_rsa.
Never distribute your private key to anyone.
The contents of ~/.ssh/id_rsa.pub needs to be delivered onto the remote machine to which you want to connect, specifically netplan, into file ~/.ssh/authorized_keys
To accomplish the transfer task, here you can use sftp service that comes with ssh.
sftp  netplan
Name (netplan:hostadm): hostadm
sftp> cd .ssh
sftp> lcd .ssh
sftp> put id_rsa.pub authorized_keys
sftp>  quit
Command cd in the sftp> shell above is for stepping into the directory, .ssh, on the remote host, netplan.
Command lcd is for stepping into the directory, .ssh, on the local desktop.
Now try to ssh to netplan. You should be prompted to enter your passphrase.
The ssh-agent can be used to store your passphrase so that you do not have to enter it each time you make a ssh or scp connection.
At a shell prompt on the desktop, type the following command:
exec /usr/bin/ssh-agent $SHELL
Then type the command:
ssh-add
and enter your passphrase(s). If you have more than one key pair configured, you will be prompted for each one. When you log out, your passphrase(s) will be forgotten. You must execute these two commands each time you log in to a virtual console or open a terminal window.
Run a remote command over ssh, for example:
ssh netplan "uname -a"
Copy files from your desktop to netplan and vise versa using scp command:
scp netplan:/etc/hosts .
touch somef.txt
scp somef.txt netplan:/home/$USER
Syncronizing directories between remote hosts by using rsync.
This tool lets you copy files and directories between a local host and a remote host.
Install rsync on both your desktop and netplan:
apt-get install rsync
Creat a directory tree and copy it over to netplan with rsync command.
mkdir -p dir1/dir2/dir3
rsync  -avz dir1 netplan:/home/$USER
Option a stands for archive (preserve links and timestamps); v is for verbose and z is for data compression when sending-receiving.
4.17. Send/receive data with netcat (Exercises)
Netcat is a very useful tool to connect to any TCP and UDP port on a remote host, and send/receive data.
Start both, netplan and rocky VMs:
virsh start netplan
virsh start rocky
Login to console of netplan:
virsh console netplan
Bring up another command prompt on the desktop and login to rocky
virsh console rocky
On each VM, execute command ip addr show to read the IP address:
ip addr show ens3
Become root on both the VMs
sudo -s
Step |
On Ubuntu (server) |
On rocky |
|---|---|---|
1. |
Install netcat: |
|
2. |
Start netcat as a server, listening on port UDP/8080: |
Connect to UDP/8080 port on netplan, 192.168.122.222: |
|
|
|
3. |
When the session is over, type Ctrl-C to stop the netcat server. |
Start typing text. Hit ENTER key. The text should appear on the both terminals. Press Ctrl+D to close the UDP connection. |
4. |
Start the server on TCP/8080 to write into a file, outputfile.txt |
Send file /etc/hosts to TCP/8080 on netplan VM via netcat |
|
|
|
5. |
After the file is received, the connection closes itself. Check the content of the file: |
|
|
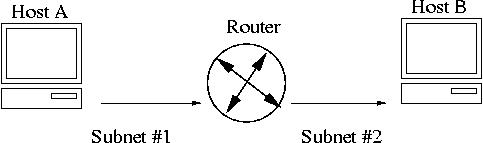
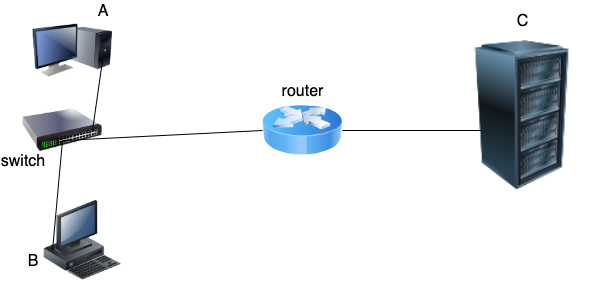
4.18. Subnets and routing
Example: Host A can communicate with both the hosts - B and C. Hosts B and C can’t communicate with each other.
What is the problem?
Answer: the routing (gateway) is not defined on Host B.
4.19. Network calculation, gateway and routing
Computers connected to the same switch are on the same network/subnet and communicate with each other directly through the switch.
For computers located on the different networks/subnets, gateway/router is needed.
To define the local subnet, netmask is used.
Subnet mask defines the network and the host parts of the IP address
Network address = Host address (logical AND) Netmask:
Address |
Decimal/Hexadecimal |
Binary |
|---|---|---|
IP address |
192.168.5.10 |
|
Netmask |
255.255.255.0 |
|
Network address |
192.168.5.0 |
|
The network address is the smallest address on the network:
11000000 10010100 00000101 00000000 = 192.168.5.0
The broadcast address is the largest address on the network:
11000000 10010100 00000101 11111111 = 192.168.5.255
Max number of hosts on the subnet: 254 = 256 - 2 The gateway address should be on the same subnet with the host
4.20. IP calculator exercises
Network IP calculations with ipcalc On the desktop, install ipcalc by using APT:
apt-get install ipcalc
Run ipcalc for network address 192.168.5.0 with subnet mask 255.255.255.0.
ipcalc 192.168.5.0/255.255.255.0
See the output for Address, Netmask, Network, HostMin, HostMax, Broadcast, Hosts/Net. Notice the same results for the same network and the different representation of the netmask:
ipcalc 192.168.5.0/24
ipcalc 192.168.5.0/11111111.11111111.11111111.00000000
Notice the same results for Netmask, Network, HostMin, HostMax, Broadcast, Hosts/Net if using the different IP addresses within the same network in ipcalc, for example:
ipcalc 192.168.5.15/24
ipcalc 192.168.5.34/24
Run ipcalc for subnets (networks) 192.168.5.0/25 and 192.168.5.128/25:
ipcalc 192.168.5.0/25
ipcalc 192.168.5.128/25
Notice the values for HostMin and HostMax in both the cases. By looking at the ranges [HostMin, HostMax], you can see, for example, that IP address 192.168.5.5 belongs to the first subnet and 192.168.5.250 to the second. You can verify that by running ipcalc on the IP addresses above and then comparing the Network values:
ipcalc 192.168.5.5/25
ipcalc 192.168.5.250/25
4.21. tcpdump command to see the traffic on NIC (Exercises)
When you need to see all the network traffic on a network card, you can run the command for the network interface. It helps to identify the subnet your system is connected to, and see all the active traffic.
On netplan VM, install tcpdump:
apt install tcpdump
Run command tcpdump on the ethernet interface:
tcpdump -v -n -i enp1s0
On rocky VM, start pingin the IP address of netplan VM:
ping 192.168.122.222
See the output in tcpdump on netplan VM. It should show some traffic related to echo request and reply from rocky VM:
    192.168.122.126 > 192.168.122.222: ICMP echo request ...
    192.168.122.222 > 192.168.122.126: ICMP echo reply ...