Security topics
Contents
11. Security topics
Vectors of attack review
Passwords and encryption types
Password cracking exercise
Network ssh brute force attacks
TCP wrappers
Stack overflow vulnerabilities
Package upgrade and verification
Network ports
Iptables
Open port scanning
12. Examples of how systems get compromised.
Cracked, stollen and sniffed passwords
SSH client with a sniffer on a multi-user system: reads user name, password and the destination host.
SSH brute force attack guesses user credentials.
Accounts with empty passwords and root privileges
World writable files and directories can be used for planting trojans.
SETUID and SETGID executables
Trojans
Stack overflow attacks on vulnerable services
Worms
13. Linux passwords.
On a local system, passwords are stored in file /etc/shadow:
mike:$6$A0NKorlZ$l3YhLlm/Y1n2BW0YBiryNl5cS6vx5k.4j4LE/vb5FUOnD.uVXkiUA1kPSHLo5/6q5MzEJTal1OY1OiE4ReSpK0:17317:0:99999:7:::
The second field consits of 3 parts: the hashing algorithm, \(6\), the salt \(A0NKorlZ\), and the hashing function, crypt, value of (password,salt) parameters,
l3YhLlm/Y1n2BW0YBiryNl5cS6vx5k.4j4LE/vb5FUOnD.uVXkiUA1kPSHLo5/6q5MzEJTal1OY1OiE4ReSpK0
The password hash is generated by function crypt. From the output of man crypt we see the hash structure components:
$id$salt$encrypted
       The following values of id are supported:

       ID(prefix) | Method
       ------------------------------------------------------------
              1   | MD5
              2a  | Blowfish (not in mainline glibc; added in some
                  | Linux distributions)
              5   | SHA-256 (since glibc 2.7)
              6   | SHA-512 (since glibc 2.7)
              y   | yescrypt, hash size 256 bits, salt size up to 512 bits
So $5$salt$encrypted is an SHA-256 encoded password and
$6$salt$encrypted is an SHA-512 encoded one.
14. MD5 and SHA512 Encryption algorithms.
The crypt algorithms are the one way function. There is no reverse function to derive the original password from its hash.
md5-crypt can be divided into three phases. Initialization, loop, and finalization:
        1. Generate a simple md5 hash based on the salt and password
        2. Loop 1000 times, calculating a new md5 hash based on the previous hash concatenated with
           alternating the password and the salt.
        3. Use a special base64 encoding on the final hash to create the password hash string
sha512-crypt allows to specify a custom number of rounds, from 1000 to 999999999. the default is 5000.
15. mkpasswd installation (Exercise).
Clone your kvm1 virtual machine into a new VM, cryptvm.
virsh shutdown kvm1
virt-clone -o kvm1 -n cryptvm -f /home/hostadm/KVM/cryptvm.qcow2
Start cryptvm and login to its console:
virsh start cryptvm
virsh console cryptvm
Fix the hostname in /etc/hostname and reset the machine ID by running the script:
./vm_id_reset.sh
Reboot the VM.
On the desktop, enter the IP address of cryptvm in /etc/hosts file to reslove its host name.
Install whois package on cryptvm:
apt-get install whois
The package contains command mkpasswd. To see what encryption algorithms are supported, run command below:
mkpasswd -m help
16. User password with different encryptions (Exercise).
On cryptvm, create user accounts mike1, mike2, mike3, mike4:
useradd -m -s /bin/bash -d /home/mike1 mike1
useradd -m -s /bin/bash -d /home/mike2 mike2
useradd -m -s /bin/bash -d /home/mike3 mike3
useradd -m -s /bin/bash -d /home/mike4 mike4
By using command mkpasswd on cryptvm create passwords for each user with the different encryption algorithm:
mkpasswd --method=des mike1
mkpasswd --method=md5 --salt=b1b2b3b4 mike2
mkpasswd --method=sha-256 --salt=b1b2b3b4 mike3
mkpasswd --method=sha-512 --salt=b1b2b3b4 mike4
Copy the hashes into the user accounts on cryptvm.
To see thelast 4 the entries in /etc/shadow
tail -4 /etc/shadow
They should look as follows:
mike1:WsjrhMNZ2uDQ6:17343:0:99999:7:::
mike2:$1$b1b2b3b4$.DXYwTXqggiphS7Cf/1Xs/:17343:0:99999:7:::
mike3:$5$b1b2b3b4$KR9Cw68GDJqOh8AHoYjzBj0NPBfZqSrK6Ys2Ylw5OL0:17343:0:99999:7:::
mike4:$6$b1b2b3b4$03/.yg7J/ZdMZk8HdieyVOYKM6S9vToVo1QZyT5j1MZ3PDl4uISxwb.Cq9lHDdgxZHpUxumfe.fYSrDb8m9Al.:17343:0:99999:7:::
From the desktop, ssh to cryptvm as users mike1, mike2, mike3, mike4 and make sure their passwords work:
ssh mike1@cryptvm
ssh mike2@cryptvm
ssh mike3@cryptvm
ssh mike4@cryptvm
17. Cracking passwords with John the Ripper (Exercise).
On cryptvm, install John the Ripper:
apt-get install john
mkdir john
cd john
Copy the hash entries from /etc/shadow:
tail -4 /etc/shadow > passwd.txt
Crack DES passwords (default):
john passwd.txt        #this cracks password
john --show passwd.txt #this shows  the cracked passwords
Crack MD5 passwords:
john --format=md5crypt passwd.txt      #this cracks password
john --show passwd.txt                 #this shows  the cracked passwords
They should look as follows:
mike1:mike1:17343:0:99999:7:::
mike2:mike2:17343:0:99999:7:::
2 password hashes cracked, 2 left
Note, John the Ripper can’t handle advanced encryption algorithms, SHA-256 and SHA-512.
18. SSH brute force attacks (Exercise)
On the desktop, download ncrack:
wget https://github.com/nmap/ncrack/archive/master.zip
Install g++, and libssl-dev package, then compile and install ncrack by following the commands below:
unzip master.zip
cd ncrack-master/
./configure
make
sudo make install
Install crunch package on the desktop, which is needed for generating a password dictionary.
apt install crunch
Make cryptvm name resolvable by creating the entry in /etc/hosts file on the desktop.
On the desktop, generate a password table, passwords.txt, by running crunch:
crunch 5 6 mike123 -o passwords.txt
Run SSH bruteforce attacks onto account mike1 on the both VMs:
ncrack -vv --user mike1 -P passwords.txt cryptvm:22
Within a few minutes, ncrack should be able to identify the correct password for user mike1 from passwords.txt list.
19. Identifying SSH login attacks in the system logs (Exercise)
On cryptvm VM, check the lines in log file auth.log and see ssh login attempts to user account mike1:
grep mike1 /var/log/auth.log | grep auth
See the successfull attempt to login:
grep mike1 /var/log/auth.log | grep -E -v '(error|[Ff]ail)'
On a RedHat/CentOS system, the similar authentication logs go into file /var/log/secure
20. TCP Wrappers
Access to inetd startable services can be controlled through daemon tcpd; it reads the access rules from files /etc/hosts.allow and /etc/hosts.deny. Similarly, the access can be controlled for the other services, such as portmap, if they have been compiled with libwrap libraries.
Format of /etc/hosts.allow and /etc/hosts.deny:
service_list: host_list
/etc/hosts.allow – is checked first by tcpd: if the entries match, the host is allowed to access the service, otherwise, /etc/hosts.deny is checked – if the entries match, the access is denied. If non of the entries match, or both the files are empty, the access is allowed.
Keywords: ALL (matches all requests), EXCEPT, LOCAL (hosts matching the local network - no domain), KNOWN (resolvable hosts), PARANOID (hostname doesn’t match IP), UNKNOWN (unresolvable hosts).
Example:
etc/hosts.allow:
sshd:       165.230.172.13  128.6.
in.tftpd:   LOCAL, .my.domain
portmap:    128.6.14.0/255.255.255.128
ALL:        .foobar.edu EXCEPT terminalserver.foobar.edu
/etc/hosts.deny:
ALL: ALL
21. ssh protection with TCP Wrappers (Exercise).
Login to the console of cryptvm VM:
virsh console cryptvm
Become root
sudo -s
Edit file /etc/hosts.deny and add the following entry:
/etc/hosts.deny
ALL: ALL
Try SSH to cryptvm from your desktop.
ssh cryptvm
The SSH attempt should fail.
Edit file /etc/hosts.allow and add the following entry:
/etc/hosts.allow
sshd: 192.168.122.
Try to SSH to smbhost from the desktop again.
22. Stack overflow example 1.
A buffer overflow is the result of stuffing more data into a buffer than it can handle.
In the example, the program has a function with a typical buffer overflow coding error.
Dangerous functions for stack overflow (don’t check the string boundaries): strcat(), strcpy(), sprintf(), vsprintf(), gets(), scanf().
#include <string.h>

void function(char *str) {

char buffer[16];

strcpy(buffer,str);
}


int main() {
char large_string[256];
int i;

for( i = 0; i < 255; i++)
large_string[i] = 'A';

function(large_string);
}
To exploit such flaw, an attacker would need to give a specially crafted encoded input. It can be done locally by using a rootkit or over a network by sending a packet with improperly advertised lengths.
23. Stack overflow example 2.
A code prompts for password, reads it from keyboard, and gives the root shell.
#include <stdio.h>
#include <string.h>

int main()
{
    int setuid(); //Declare the type of the functions used below
    int system();
    int gets();

    char buff[10]; //Defines the input array buff of 10 Bytes size
    int pass = 0;

    printf("\n Enter the password : \n");
    gets(buff);

    if(strcmp(buff, "Password1") != 0)
    {
        printf ("\n Wrong Password \n");
    }
    else
    {
        printf ("\n Correct Password \n");
        pass = 1;
    }

    if(pass != 0)
    {
        printf ("pass=, %3d", pass); //See how variable 'pass' is corrupted

       /* Now Give root or admin rights to user*/
        printf ("\n Root privileges given to the user \n");

        setuid(0);
        system("/bin/bash");
    }

    return 0;
}
Any given password string, exceeding 11 letters, would corrupt the memory region, containing variable pass, therefore cause the code to give the root shell.

24. Stack overflow exercise.
On cryptvm, download the source code and the Makefile:
wget http://linuxcourse.rutgers.edu/summer/html/lessons/security_remote/Downloads/root_shell.c
wget http://linuxcourse.rutgers.edu/summer/html/lessons/security_remote/Downloads/Makefile
Compile the source code, and assigne setuid root to the compiled executable:
make
sudo chown root:root root_shell
sudo chmod u+s root_shell
Run the executable:
./root_shell
When prompted for password, type in a long string: RRRRRRRRRRRRRRRRRRRR Notice, you got the root shell.
The way to fix it: use function fgets instead of gets, for example:
//gets(buff);
  fgets(buff,sizeof(buff),stdin);
25. Package upgrades and md5 checksum verification. (Exercise)
On cryptvm VM, run upgrades on regular bases and every time a new vulnerability discovered in installed packages:
apt-get update
apt-get upgrade
On a CentOS, you would use use dnf for updates: dnf update
Verify md5 checksum of downloaded software:
md5sum root_shell.c
Install package tcpd:
apt install tcpd
On cryptvm VM, install dlocate and verify md5 checksum of the files installed with a package:
apt-get install dlocate
dlocate -md5sum tcpd
dlocate -md5check tcpd
On CentOS, one would use rpm -V command to verify package integrity: rpm -V tcp_wrappers
26. Open Ports List. (Exercise)
Install package net-tools on cryptvm VM:
apt install net-tools
To see what ports are open, run command
netstat -nal
and check on TCP and UDP ports in the listing. To see what processes are bound to what ports, run as root
netstat -nalp | less
output:
Active Internet connections (servers and established)
Proto Recv-Q Send-Q Local Address       Foreign Address   State       PID/Program name
tcp        0      0 0.0.0.0:515         0.0.0.0:*         LISTEN       1742/lpd Waiting
tcp        0      0 127.0.0.1:25        0.0.0.0:*         LISTEN       1726/exim4
tcp        0      0 192.168.1.101:1040  128.6.238.10:22   ESTABLISHED  2229/ssh
tcp        0      0 192.168.1.101:1024  128.6.238.12:993  ESTABLISHED  2195/pine
tcp6       0      0 :::22               :::*              LISTEN       1813/sshd
udp        0      0 0.0.0.0:68          0.0.0.0:*                      2085/dhclient
Similarly,
netstat -n --inet --listening --programs
Also, the processes responsible for the open ports can be identified with
lsof -i
See example (Links to an external site.).
Syntax of lsof:
lsof -i [TCP|UDP][@host][:port]
To list all open files for specific processes:
lsof -p PID
lsof -c COMMAND
lsof -u username
To list all open files
lsof
Exercise
SSH to cryptvm VM from the desktop, become root, and run lsof to see the open internet ports:
ssh cryptvm
sudo -s
lsof -i -P
Note, option “-P” shows you the port number.
You should see the ports opened for the following services: dhclient3, udp/68, sshd, tcp/22.
If you have installed Samba in the previous class, you should also see the Samba related services with their ports, such as smbd, tcp/137,138,139, tcp/445, and nmbd, udp/136,138.
27. Closing ports by disabling network services.
The open ports are related to the aplications/processes, which start either at the system startup or through inetd/xinetd. For the Systemd aware applications,
systemctl stop service_name
systemctl disable service_name
Vulnerable services:
telnet, rsh, rcp, rexec, ftp, portmap, nfs, mountd, ypbind, ypserv. Disable them if your computer is on the open Internet. But if you need them, install a firewall and implement the tcp_wrappers.Relatively secure services: Services protected with SSL libraries for encrypted connection such as
SSH, LDAP, Apache; Kerberos.
28. IP filtering firewalls (iptables)
Packet filtering is implemented through Linux Kernel.
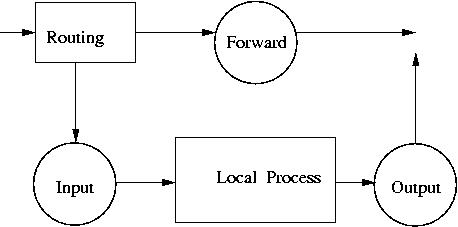
Chains for network packets:
INPUT
OUTPUT
FORWARD
Chains are combined into tables:
filter (default)
NAT
mangle
Each of the chains filters data packets based on Source and Destination IP Source and Destination Port number Network interface State of the packet Target for the rule:
ACCEPT
DROP
REJECT
QUEUE
RETURN
LOG
29. Simple iptables script
executable script:
#!/bin/bash
IPT=/sbin/iptables

# Flush the tables
$IPT -F INPUT
$IPT -F OUTPUT
$IPT -F FORWARD

# Define default policy to DROP packets
$IPT -P INPUT   DROP
$IPT -P OUTPUT  DROP
$IPT -P FORWARD DROP

# Permit DNS traffic
$IPT -A INPUT -p udp --sport 53 -j ACCEPT
$IPT -A OUTPUT -p udp --dport 53 -j ACCEPT

# Accept local-network return traffic from private network 192.168.122.0/24:
$IPT -A INPUT -m state -p tcp --dport 1024:65535 --state ESTABLISHED,RELATED -s 192.168.122.0/24 -j ACCEPT
$IPT -A OUTPUT -m state -p tcp --sport 1024:65535 ! --state INVALID -d 192.168.122.0/24 -j ACCEPT

# Accept all HTTP connections
$IPT -A INPUT -m state -p tcp --dport 80 ! --state INVALID -j ACCEPT
$IPT -A OUTPUT -m state -p tcp --sport 80 --state ESTABLISHED,RELATED -j ACCEPT

# Accept local (192.168.122.0/24) SSH traffic
$IPT -A INPUT -m state -p tcp --dport 22 ! --state INVALID -s 192.168.122.0/24 -j ACCEPT
$IPT -A OUTPUT -m state -p tcp --sport 22 --state ESTABLISHED,RELATED -d 192.168.122.0/24 -j ACCEPT

# Accept all local (loopback) traffic on the lo interface
$IPT -A INPUT -s 127.0.0.1 -i lo -j ACCEPT
$IPT -A OUTPUT -d 127.0.0.1 -o lo -j ACCEPT

# Log all other traffic
$IPT -A INPUT -j LOG
$IPT -A OUTPUT -j LOG
To check the current iptables rules, run
/sbin/iptables -n -L
30. Configuring iptables firewall (Exercise)
Make sure iptables have been installed on cryptvm VM:
dpkg -l | grep iptables
Check the iptables rules on cryptvm:
/sbin/iptables -n -L
On cryptvm, download the iptables script from fw-script.sh (Links to an external site.), make it executable, then run:
wget http://linuxcourse.rutgers.edu/summer/html/lessons/security_remote/fw-script.sh
chmod 755 fw-script.sh
./fw-script.sh
Check the iptables rules again,
/sbin/iptables -n -L
You should see the new active rules.
Try pinging your desktop private virtual IP address from cryptvm:
ping 192.168.122.1
Try pinging cryptvm VM from the desktop:
ping cryptvm
To enable ping, you need to add the following rules to your fw-script.sh (you can include them somwhere after the default policy)
# Echo - uncomment to allow your system to be pinged.
$IPT -A INPUT -p icmp -s 192.168.122.0/24 --icmp-type 0 -j ACCEPT
$IPT -A INPUT -p icmp -s 192.168.122.0/24 --icmp-type 8 -j ACCEPT
$IPT -A INPUT -p icmp -s 192.168.122.0/24 --icmp-type 11 -j ACCEPT
$IPT -A OUTPUT -p icmp -d 192.168.122.0/24 --icmp-type 0 -j ACCEPT
$IPT -A OUTPUT -p icmp -d 192.168.122.0/24 --icmp-type 8 -j ACCEPT
$IPT -A OUTPUT -p icmp -d 192.168.122.0/24 --icmp-type 11 -j ACCEPT
After the script is modified, you need to run the script,
Run it:
./fw-script.sh
Try to ssh to some host located outside of the lab, for example, engsoft.rutgers.edu.
Try running apt update command.
Both SSH and apt would hang up because the iptable rules don’t allow initiating outbound TCP connections with remote hosts and their returm from outside of the local virtual private network, 192.168.122.0/24.
To enable return TCP-connections from the outside of the subnet, change “-s 192.168.122.0/24” and “-d 192.168.122.0/24” for “-s 0/0” and “-d 0/0” in the rules for “Accept local-network return traffic…” in the script. The new rules should look as follows:
After the script is modified, you need to run the script,
./fw-script.sh
Try ssh to the host and apt command again. They should run fine.
31. fail2ban (Exercise)
Fail2ban is a software that scans log files for brute force login attempts in real-time and bans the attackers with iptables. This program works in the background and continuously scans the log files for unusual login patterns and security breach attempts.
Fail2ban is similar to DenyHosts, however unlike DenyHosts which focuses on SSH, fail2ban can be configured to monitor any service that writes login attempts to a log file, and instead of using /etc/hosts.deny only to block IP addresses/hosts, fail2ban can use iptables.
Fail2ban installation on Ubuntu VM, cryptvm.
First, flush the active iptables rules:
iptables -P INPUT   ACCEPT
iptables -P OUTPUT  ACCEPT
iptables -P FORWARD ACCEPT
iptables -F
Install fail2ban package:
apt install fail2ban
Backup the default configuration file
cp /etc/fail2ban/jail.conf /etc/fail2ban/jail.local
Create a new configuration file, /etc/fail2ban/jail.d/sshd.local, with the following content:
[sshd]
enabled = true
port = 22
filter = sshd
logpath = /var/log/auth.log
maxretry = 5
bantime = 86400
Restart fail2ban:
systemctl restart fail2ban
Check the active fail2ban status:
fail2ban-client status
Tru ssh to cryptvm from the other VM and use incorrect password 5 times. Check the iptables settings on cryptvm:
iptables -nL
Remove the banned IP address from the iptables, for example:
fail2ban-client set sshd unbanip 192.168.122.79
32. Port scanning (Exercise)
After unnecessary ports are closed and firewall implemented, the system should be scanned from a remote host with NMAP. To scan the TCP ports, for example on 192.168.5.42:
nmap -sT -O 192.168.5.42
ouput:
The output may look like the following:
Starting nmap  ( http://www.insecure.org/nmap/ ) at 2021-04-05 20:56 EDT
Interesting ports on node18.linux.class (192.168.5.42):
(The 1653 ports scanned but not shown below are in state: closed)
PORT      STATE SERVICE
22/tcp    open  ssh
111/tcp   open  rpcbind
139/tcp   open  netbios-ssn
445/tcp   open  microsoft-ds
513/tcp   open  login
514/tcp   open  shell
919/tcp   open  unknown
953/tcp   open  rndc
2049/tcp  open  nfs
32772/tcp open  sometimes-rpc7
MAC Address: 00:10:5A:0A:B3:E8 (3com)
Device type: general purpose
Running: Linux 2.4.X|2.5.X|2.6.X
OS details: Linux 2.4.18 - 2.6.7
Uptime 8.143 days (since Mon Mar 28 16:30:58 2021)
To scan the UDP ports, for example on 192.168.5.42:
nmap -sU -v 192.168.5.42
Nessus is an extension of NMAP; it provides vulnerability details and security advises.
Exercise.
Scan the TCP ports on cryptvm from your desktop:
nmap -sT -O cryptvm
Scan the UDP ports on cryptvm from your desktop:
nmap -sU -v cryptvm
33. References
Password hashing with MD5-crypt in relation to MD5
Implementation of SHA512-crypt vs MD5-crypt
How are passwords stored in Linux (Understanding hashing with shadow utils)
How To Force Users To Use Strong Passwords In Debian, Ubuntu
Bruteforce attack on RDP, SSH & FTP using Ncrack