Start/stop services, environment file, job scheduling.
Contents
7. Start/stop services, environment file, job scheduling.
Bootup sequence
Systemd
Service start and stop
Unit files
Environment files
Scheduling jobs with at and cron
7.1. Linux Bootup and Login Sequence
BIOS boot-ups; checks peripherals; finds bootable device.
First sector loaded into RAM and executed– GRUB prompt appears.
Kernel loaded from sector list, /boot/vmlinuz-5.10.0-13-amd64; places the appropriate initial RAM disk image, initrd, into RAM.
Kernel executed; unpacks.
Kernel initializes hardware.
Kernel mounts root, /, file system, say /dev/sda1.
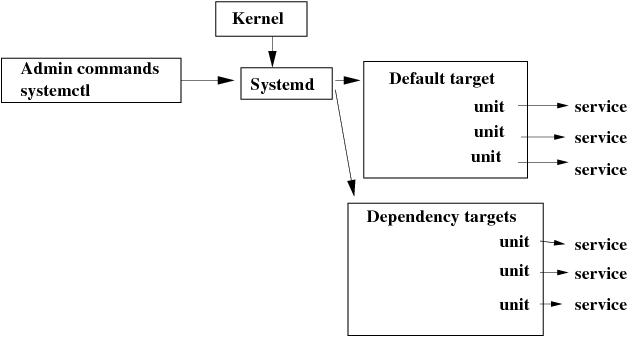
Kernel executes init (Systemd) as PID 1.
Systemd initiates the units in the default target. The units start the services.
Among the started services, there are agetty programs on each terminal and the login process.
login requests user name and password and validates them against /etc/passwd, or NIS maps, or LDAP (depending on PAM settings).
login starts a shell.
The shell executes the appropriate startup files (.profile for sh, ksh; .bash_profile for BASH; .cshrc and .login for csh and tcsh).
The shell prints a prompt and waits for input.
7.2. VM setup for startup scripts. (Exercise)
Clone kvm1 to a new NFS server VM host, run01, by executing the command below:
virsh shutdown kvm1
virt-clone  -o kvm1 -n run01 -f /home/hostadm/KVM/run01.qcow2
Check if the new VM is in the list, start it, then login to its console:
virsh list --all
virsh start run01
virsh console run01
Fix the host name. Replace kvm1 with run01 in /etc/hostname file. Reset the machine ID by running the following commands on kvm3:
./vm_id_reset.sh
Reboot the VM:
reboot
After reboot, the new VM should come up with the correct host name.
7.3. Systemd is the parent of all processes (Exercise)
Systemd is the parent of all processes on the system, it is executed by the kernel and is responsible for starting all other processes; it is the parent of all processes whose natural parents have died and it is responsible for reaping those when they die.
virsh console run01
Install package psmisc and run command pstree
sudo -s
apt-get install psmisc
pstree
Output:
systemd─┬─ModemManager───3*[{ModemManager}]
        ├─accounts-daemon───3*[{accounts-daemon}]
        ├─agetty
        ├─atd
        ├─cron
        ├─dbus-daemon
        ├─login───bash───pstree
        ├─multipathd───6*[{multipathd}]
        ├─networkd-dispat
        ├─polkitd───3*[{polkitd}]
        ├─rsyslogd───3*[{rsyslogd}]
        ├─sshd
        ├─systemd───(sd-pam)
        ├─systemd-hostnam
        ├─systemd-journal
        ├─systemd-logind
        ├─systemd-network
        ├─systemd-resolve
        ├─systemd-timesyn───{systemd-timesyn}
        ├─systemd-udevd───10*[systemd-udevd]
        ├─udisksd───5*[{udisksd}]
        └─unattended-upgr───{unattended-upgr}
pstree -p -l
shows the process tree with their PID in the long (non-truncated) format. /usr/bin/pstree comes with package psmisc.
7.4. Systemd in services startup.
For technical details, read the man pages:
man init
man systemd
man systemctl
7.5. Administrative commands to start/stop services (Exercises)
Systemd driven services are available in Ubuntu 18.04 and RedHat 7 and newer
Command systemctl talks to systemd. To see all the services registered with systemd, run the following:
systemctl list-units --type service
To stop rsyslog services, run
systemctl stop rsyslog
To see the status of the service:
systemctl status rsyslog
Stop syslog.socket then rsyslog.service:
systemctl stop syslog.socket
systemctl stop rsyslog.service
To see the status of the service:
systemctl status rsyslog
To start the service and see its status:
systemctl start rsyslog
systemctl status rsyslog
7.5.1. Legacy System V services
Used to be available on any Linux distro. Now they are provided within Systemd for backward compatibility. The System V (non-event driven) service startup scripts are located in directory /etc/init.d. For example to stop and then start cups printing service, use the following
apt-get install cups
/etc/init.d/cups stop
/etc/init.d/cups start
/etc/init.d/cups status
Is the same as
service cups stop
service cups start
service cups status
7.6. System Run Levels (Legacy System V)
This is what used to be on older Linux distros. At bootup, init reads /etc/inittab file and executes all scripts for default run level. If the /etc/inittab is absent, the default run level is 2. On Unix, there are 7 conventional run levels (0,1,2,3,4,5,6). However, 10 levels are possible (0 – 9).
On Ubuntu and Debian,
Runlevel  0  - is halt.
Runlevel  1  - is single-user.
Runlevels 2-5  are multi-user.
Runlevel  6  - is reboot.
On the other Linux systems, such as RedHat,
Runlevel  0 - halt
Runlevel  1 - Single user mode
Runlevel  2 - Multiuser, without NFS (The same as 3, if you do not have networking)
Runlevel  3 - Full multiuser mode
Runlevel  4 - unused
Runlevel  5 - X11
Runlevel  6 - reboot
7.7. Comparison of SysV Runlevels with systemd Targets
Runlevel |
Target Units |
Description |
|---|---|---|
0 |
runlevel0.target, poweroff.target |
Shut down and power off the system. |
1 |
runlevel1.target, rescue.target |
Set up a rescue shell. |
2 |
runlevel2.target, multi-user.target |
Set up a non-graphical multi-user system. |
3 |
runlevel3.target, multi-user.target |
Set up a non-graphical multi-user system. |
4 |
runlevel4.target, multi-user.target |
Set up a non-graphical multi-user system. |
5 |
runlevel5.target, graphical.target |
Set up a graphical multi-user system. |
6 |
runlevel6.target, reboot.target |
Shut down and reboot the system. |
7.8. Working with Systemd targets (Exercises)
Viewing the Default Target:
systemctl get-default
Viewing the Current Target
systemctl list-units --type target
Changing the Default Target
systemctl set-default multi-user.target
Reboot. Run commands
systemctl get-default
systemctl list-units --type target
Set password for root:
sudo -s
passwd
Changing the Current Target
systemctl isolate graphical.target
Check the Target units
systemctl list-units --type target
Changing to Rescue Mode
systemctl rescue
Check the Target units
systemctl list-units --type target
Changing to Emergency Mode
systemctl emergency
Check the Target units
systemctl list-units --type target
Run command pstree to see the number of processes running.
7.9. Adding service to systemd startup (Exercise)
In directory /home/hostadm, create a shell script file, test.sh:
File content:
#!/bin/bash
echo current date/time is $(/bin/date) >> /home/hostadm/timecheck.txt
Make the script executable
chmod 755 /home/hostadm/test.sh
In directory /lib/systemd/system, create unit service file, test.service:
File content:
[Unit]
Description=test startup

[Service]
Type=simple
ExecStart=/home/hostadm/test.sh

[Install]
WantedBy=default.target
Enable service test in systemd:
systemctl daemon-reload
systemctl enable test
Run commands
systemctl start test
systemctl status test
Check if file /home/hostadm/timecheck.txt has been updated. Reboot the VM. Run command
systemctl status test
Check if file /home/hostadm/timecheck.txt has been updated.
7.10. Adding stop script to the unit (Exercise)
In directory /home/hostadm, create another shell script file, stop.sh:
script file:
#!/bin/bash
echo STOP >> /home/hostadm/timecheck.txt
Make the script executable
chmod 755 /home/hostadm/stop.sh
In directory /lib/systemd/system, modify the unit service file, test.service by adding two lines in the [Service] block:
test.service:
[Unit]
Description=test startup

[Service]
Type=simple
ExecStart=/home/hostadm/test.sh
RemainAfterExit=true
ExecStop=/home/hostadm/stop.sh

[Install]
WantedBy=default.target
Reload systemd:
systemctl daemon-reload
Run commands
systemctl stop test
systemctl status test
Check if file /home/hostadm/timecheck.txt has been updated with entry “STOP”, generated by the stop.sh script.
7.11. User settings at login.
When a user logins, getty gives him SHELL.
In case of /bin/bash, the following initialization/configuration scripts are executed:
/etc/profile |
System wide initialization file. Runs at log in. |
|---|---|
~/.bash_profile |
Executed automatically after /etc/profile |
~/.bash_login |
If ~/.bash_profile is absent, the script is executed after /etc/profile, otherwise, ignored. |
~/.profile |
If both ~/.bash_profile and ~/.bash_login are absent, the script is executed after /etc/profile, otherwise, ignored. |
~/.bashrc |
It is called from ~/.bash_profile at startup. An interactive shell that is not a login shell also reads ~/.bashrc . |
~/.bash_logout |
Executed automatically during log out |
When you need to specify environment variables, for example PATH, you can place them in /etc/profile for all users on the system, or in ~/.bashrc for the specific user.
When the user logs out, control returns to init, which wakes up and spawns a new getty on the terminal port.
7.12. Login scripts (Exercise).
Complete the exercises below on run01 VM
In a user home directory, there should be scripts .profile and .bashrc. Create a new user account, for example jerry:
useradd -m -s /bin/bash jerry
passwd jerry
In file .profile, put entry
file content
echo PROFILE
In file .bashrc, put entry
file content
echo BASHRC
Logout and login as user jerry and notice PROFILE in the login prompt. Start a new shell,
/bin/bash
notice BASHRC in the new shell prompt.
7.13. One time scheduled jobs: at
To schedule a job to run once at a particular time, use command at time_to_run, for example, to run at 8:40 am:
at 0840
Then type-in commands and finish with ^D
Time format examples:
at 1825 Mar 4
at now + 1 minute
at now + 1 hour
at now + 1 day
To run an executable file or a script:
at -f filename time_to_run
For example,
at -f /home/jerry/script.sh 2030
at -f /home/jerry/script.sh 11am Mar 30
Command at puts a scheduled job in a queue in /var/spool/at/; daemon /usr/sbin/atd checks for queued jobs in that directory and runs them.
To check scheduled job status, run
atq
To delete scheduled job, run
atrm
Permssions on using at:
If /etc/at.allow does not exist, /etc/at.deny is checked, every user name not mentioned in it is then allowed to use at. If neither exists, only the superuser is allowed use of at. An empty /etc/at.deny means that every user is allowed use these commands.
7.14. Scheduled periodical jobs: cron.
To schedule jobs to execute repetitively at regular intervals, use cron. Daemon crond runs every minute and searches /var/spool/cron for crontab files and checks /etc/crontab and /etc/cron.d. /etc/crontab:
cron file content
SHELL=/bin/sh
PATH=/usr/local/sbin:/usr/local/bin:/sbin:/bin:/usr/sbin:/usr/bin
# m h dom mon dow user  command
17 *    * * *   root    run-parts --report /etc/cron.hourly
25 6    * * *   root    test -x /usr/sbin/anacron || run-parts --report /etc/cron.daily
47 6    * * 0   root    test -x /usr/sbin/anacron || run-parts --report /etc/cron.weekly
52 6    1 * *   root    test -x /usr/sbin/anacron || run-parts --report /etc/cron.monthly
Format: (time) (user) (executable) time: minute (0-59), hour(0-23), day of the month(1-31), month(1-12), week day (0-6) starting with Sun. Example:
cron file content:
25 10 * * * root  /root/scheduled.sh   # runs /root/scheduled.sh every day at 10:25
25 10 * * 6 root  /root/scheduled.sh   # runs every Sat. at 10:25
*/5 * * * 6 root  /root/scheduled.sh   # runs every 5 min on Sat.
On systems that don’t run continuously, such as desktops and laptops, a scheduled in cron job may miss its time to run. Another scheduler, anacron, can be used to run periodically and when the system boots up. /etc/anacrontab:
anacron file content
SHELL=/bin/sh
PATH=/usr/local/sbin:/usr/local/bin:/sbin:/bin:/usr/sbin:/usr/bin

# These replace cron's entries
1       5       cron.daily       nice run-parts --report /etc/cron.daily
7       10      cron.weekly      nice run-parts --report /etc/cron.weekly
@monthly        15      cron.monthly nice run-parts --report /etc/cron.monthly
Format: (period in days) (delay in minutes) (job-identifier) (command) Usually, anacron runs at system startup and daily at 7:30 a.m. by cron.
7.15. Scheduling at and cron. (Exercises).
Complete the exercises below on run01 VM
Install package at:
apt-get install at
As user hostadm, Create script, mem.sh, to check memory status:
file content
#!/bin/bash
# Checks memory status through cron

of=/home/hostadm/mem.out
dt=$(date)

echo "Memory status (in MB) on $dt:" >> $of
free -m >> $of
echo "------------------" >> $of
Make it executable
chmod 755 mem.sh
and run through at:
at -f mem.sh now + 1 minute
Run atq to make sure the job is scheduled. In a minute, check content of a new file, mem.out; run atq again.
Remove file mem.out. Add the following entry in /etc/crontab below the other scheduled tasks:
file content
*/2 * * * * root /home/hostadm/mem.sh
Check if the content of mem.out is updated every 2 minutes.