6. Network File System (NFS)
6.1. Outline of the NFS topic
Network File System (NFS) sharing.
Services involved in NFS
File system exporting and mounting
NFS server setup on a VM
NFS client setup on a VM
File access permissions on a server
Automount
6.2. File system sharing over network
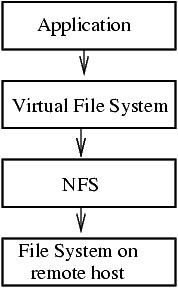
NFS defines a method of sharing files in which files residing on one or more remote servers can be accessed on a local client system in a manner that makes them appear as local files and directories.
6.3. NFS versions
NFS was originally developed by Sun Microsystems:
NFSv2 released in 1985 (no longer supported on Ubuntu and RedHat)
NFSv3 released in 1995
NFSv4 released in 2003 (developed by Internet Engineering Task Force (IETF))
NFSv4.1 released in 2010
NFSv4.2 released in 2016
Detailed info about the NFS versions for Linux is available at on Wiki (Links to an external site.) NFS support should be enabled in Linux kernel. Check the kernel config file for ‘CONFIG_NFS’:
grep CONFIG_NFS /boot/config-*
output
CONFIG_NFS_V2=m
CONFIG_NFS_V3=m
CONFIG_NFS_V3_ACL=y
CONFIG_NFS_V4=m
CONFIG_NFS_V4_1=y
CONFIG_NFS_V4_2=y
CONFIG_NFS_V4_1_IMPLEMENTATION_ID_DOMAIN="kernel.org"
CONFIG_NFS_V4_1_MIGRATION=y
CONFIG_NFS_V4_SECURITY_LABEL=y
Verify NFS support at run time:
lsmod | grep nfs
grep nfs /proc/filesystems
Verify what NFS version is currently running:
nfsstatnfsstat
Check the NFS version currently being used by the client
mount
6.4. File system virtualization
VFS is an abstraction of a local file system provided by Kernel for an application.
Platform independent.
Preserves or emulates Unix file system semantics.
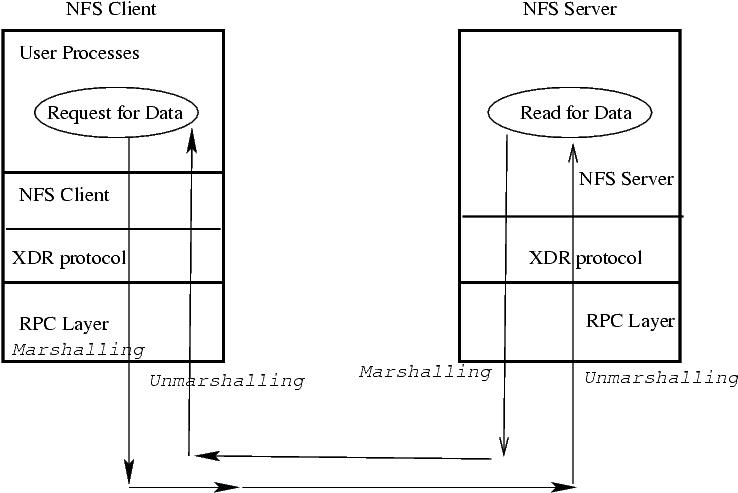
6.5. NFS and RPC
NFS utilizes Remote Procedure Calls (RPC) layer for server – client communications.
Marshalling - Packaging arguments in XDR (eXternal Data Representation) format.
XDR format is platform independent
RPC allows applications on one host to call procedures (functions) on the other remote host
RPC allows a server to respond to more than one version of a protocol at the same time (NFS 4 or 3).
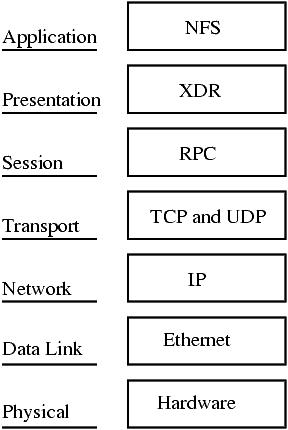
6.6. NFS in the 7 layer OSI tcp/ip protocol
NFS, XDR and RPC fit into the top 3 layes of the OSI model.
XDR translates DATA into canonical (platform independent) format
RPC provides remote procedure calls that appear as local processes.
6.7. NFS server daemons
Daemons are processes running on a server and providing some services.
Several daemons are involved in NFS.
The same server can offer NFSv4 and NFSv3 file system access. It is up to the client to decide which version to use.
NFS version 3 server daemons: |
NFS version 4 server daemons: |
|---|---|
rpcbind handles RPC requests and registers ports for RPC services. |
(Unnecessary in NFSv4. Good to have for diagnostics.) |
rpc.mountd handles the initial mount requests. |
rpc.mountd handles the initial mount requests. |
nfsd or [nfsd] handles data streaming. |
nfsd or [nfsd] handles data streaming. |
rpc.rquotad handles user file quotas on exported volumes. |
|
rpc.lockd handles file locking to make sure several processes don’t write into the same file. |
|
rpc.statd Interacts with the rpc.lockd daemon and provides crash and recovery for the locking services. |
|
rpc.idmapd handles user and group mapping (optional). |
To verify that the services have started and registeresd with rpcbind, run command
rpcinfo -p
To see rpc services on a remote host, for example with IP address 192.168.112.3:
rpcinfo -p 192.168.112.3
6.8. NFS client daemons
NFS version 3 client daemons |
NFS version 4 client daemons |
|---|---|
rpcbind |
rpcbind (unnecessary) |
rpc.lockd |
|
rpc.statd |
|
rpc.idmapd (optional) |
6.9. NFS mount and file handle
An NFS client receives file handles from NFS server when executes mount and lookup calls.

The file handles on a client relate to the file pointers on an NFS server (inode number, disk device number, and inode generation number).
If the NFS server crashes or reboots, NFS dependent applications on the client hang and then continue running after the server becomes available.
If the file system on the server is changed or corrupted, the client gets a stale file handle error.
6.10. Export/mount directory over NFS
NFS server exports a directory and NFS client mounts it.
NFS server may run several versions of NFS, for example, NFSv3, and NFSv4.
NFS client chooses the NFS version at the mount time.
6.11. VM setup for NFS (Exercises)
Clone kvm1 to a new NFS server VM host, master, by executing the command below:
virt-clone -o kvm1 -n master -f /home/hostadm/KVM/master.qcow2
Check if the new VM is in the list, start it, then login to its console:
virsh list --all
virsh start master
virsh console master
Fix the host name: Replace kvm1 with master in /etc/hostname file. Reset the machine ID by running the following commands on master:
rm -f /etc/machine-id
rm /var/lib/dbus/machine-id
dbus-uuidgen --ensure=/etc/machine-id
dbus-uuidgen --ensure
Clear the DHCP leased IP settings:
dhclient -r ens3
Execute command reboot Reboot the VM. After reboot, the new VM should come up with the correct host name and the MAC address. Clone kvm1 to a new NFS client VM host, n01, by executing the command below:
virt-clone -o kvm1 -n n01 -f /home/hostadm/KVM/n01.qcow2
Fix the host name and the host ID of n01 in the same way as for master VM above. Both the VMs need to be able to communicate with each other by their host names, therefore we need to define their host name-to-ip match in /etc/hosts files. In /etc/hosts file on the master put the IP addreaas of n01 and host name n01, for example:
192.168.122.64 n01
On n01 VM, similarly set the host name resolution for the master in /etc/hosts file, for example:
192.168.122.60 master
6.12. NFS server configuration (Exercises)
Install NFS server packages on master VM by following the instructions below.
apt-get install rpcbind nfs-common nfs-kernel-server
Create a directory to export:
mkdir -p /NFS/home
Create a new user with home directory in /NFS/home:
/usr/sbin/groupadd -g 1666 edward
/usr/sbin/useradd -m -s /bin/bash -u 1666 -g 1666 -d /NFS/home/edward edward
Copy some files from /etc into directory /NFS/home/edward and give them ownership “edward”:
cp /etc/hosts /NFS/home/edward
cp /etc/nsswitch.conf /NFS/home/edward
chown edward:edward /NFS/home/edward/*
Then
cp /etc/securetty /NFS/home/edward
and live it with root ownreship.
Modify file /etc/exports to include the following entry:
file content
/NFS/home n01(rw)
Make sure host n01 is reachable from master:
ping -c 2 n01
Start rpcbind and all the NFSv3 and NFSv4 related services:
systemctl restart rpcbind
systemctl restart rpc-statd
systemctl restart nfs-kernel-server
Make sure the services are running by executing command rpcinfo:
rpcinfo -p
You should see the following:
output
program vers proto   port  service
100000    4   tcp    111  portmapper
100000    3   tcp    111  portmapper
100000    2   tcp    111  portmapper
100000    4   udp    111  portmapper
100000    3   udp    111  portmapper
100000    2   udp    111  portmapper
100024    1   udp  41147  status
100024    1   tcp  50021  status
100005    1   udp  45022  mountd
100005    1   tcp  47677  mountd
100005    2   udp  43482  mountd
100005    2   tcp  60947  mountd
100005    3   udp  50653  mountd
100005    3   tcp  36245  mountd
100003    3   tcp   2049  nfs
100003    4   tcp   2049  nfs
100227    3   tcp   2049
100003    3   udp   2049  nfs
100227    3   udp   2049
100021    1   udp  40359  nlockmgr
100021    3   udp  40359  nlockmgr
100021    4   udp  40359  nlockmgr
100021    1   tcp  37625  nlockmgr
100021    3   tcp  37625  nlockmgr
100021    4   tcp  37625  nlockmgr
6.13. NFS client configuration (Exercises)
Install the NFS related packages by using apt-get on n01 VM:
apt-get install rpcbind nfs-common
Run command rpcinfo pointing at the server:
rpcinfo -p master
If you see the same output as on the NFS server, it means the server allows you to access the rpcbind and the rpc services. Check what directories are exported to you from the server:
/sbin/showmount -e master
It should show:
output
/NFS/home n01
Now you are ready to mount its directory on n01.
6.14. NFS mount on a client (Exercises)
Create a new mounting point and mount the exported directory onto it via NFS:
mkdir -p /NFS/home
mount  master:/NFS/home /NFS/home
To make sure the directory has been mounted, run command
mount
Run also
df -h
The mounted directory shows up in the bottom of the file systems list:
master:/NFS/home 494M 78M 390M 17% /NFS/home
To see who is the owner of the files in the directory, run command
ls -l /NFS/home/edward
Since there is no user with UID=1666 and GID=1666 on the node, the mounted directory would belong to a non-existent user:
ls -l /NFS/home/edward
total 5
-
-rw-r--r-- 1 1666 1666 104 Feb 10 19:32 hosts
-rw-r--r-- 1 1666 1666 1750 Feb 10 19:32 nsswitch.conf
-rw------- 1 root root 114 Feb 10 2003 securetty
Create user edward with UID=GID=1667:
/usr/sbin/groupadd -g 1667 edward
/usr/sbin/useradd -m -s /bin/bash -u 1667 -g 1667 -d /NFS/home/edward edward
Assign password to the user:
passwd edward
Now try to change the ownership of the directory on the node:
chown edward:edward /NFS/home/edward
It doesn’t work:
chown: changing ownership of `/NFS/home/edward': Operation not permitted
Change the UID and GID of edward to be consistent with those on the NFS server:
/usr/sbin/groupmod -g 1666 edward
/usr/sbin/usermod -u 1666 -g 1666 edward
Become user edward then step into directory /NFS/home:
su edward
cd /NFS/home/edward
and see if you can create files in this directory:
touch newfile.txt
Exit from user edward account:
exit
Unmount the directory,
umount /NFS/home
Modify file /etc/fstab by including a new entry with /NFS/home:
-
master:/NFS/home /NFS/home nfs rw,vers=4 0 0
Then run
mount -a
Check if it is mounted
df -h
Unmounting busy directories.
Open another terminal on your desktop and ssh to n01 as user edward. You can figure out the IP address of n01 by running command ip addr in the console of n01.
For example, if n01 has IP address 192.168.122.64, the ssh command on the desktop looks as follows:
ssh edward@192.168.122.64
Note, in your KVM environment the IP address of n01 may be different.
In the ‘root’ console of n01 try to unmount the directory:
umount /NFS/home
If the directory can not get unmounted and you receive error message “device is busy”, check what processes hold the directory by executing command lsof +D on the file system. Specifically, in our case:
lsof +D /NFS/home
Kill the process, for example with PID 1367, and try to unmount the directory again.
kill -9 1367
umount /NFS/home
Remove the NFS entry from /etc/fstab Try to avoid NFS mounting through /etc/fstab. Use either manual mount or automount.
6.15. Automount (Exercises)
Install autofs on n01 (NFS client).
apt-get install autofs
Make sure /NFS/home directory is unmounted:
df -h
If it shows in the list of mounted file systems, unmount it. Remove directory /NFS/home:
rmdir /NFS/home
Configure the master map file, /etc/auto.master, and specify the timeout 60 seconds. The content of file /etc/auto.master should be the following:
/NFS /etc/auto.exports --timeout=60
Configure the exports map file, /etc/auto.exports:
home -rw,fstype=nfs4 master:/NFS/home
Restart or reload autofs:
systemctl restart autofs
Access the file system and check if it gets mounted:
cd /NFS/home
df -h
Step out of the directory:
cd
Run command df -h again in about two minutes to see if it gets unmounted automatically after the inactivity period.
6.16. Stale NFS file handle (Exercise)
On the NFS server, master, create a new directory tree under NFS exported directory:
mkdir -p /NFS/home/test/demo
On the client, n01, step into the directory:
cd /NFS/home/test
ls
On the NFS server, master, remove directory test with its subdirectory:
cd /NFS/home
rm -rf test
On the client, run
ls
It should give you the following error:
ls: cannot open directory .: Stale NFS file handle
Step out of the NFS mounted directory:
cd /
The autofs will unmount the NFS directory after the inactivity period, one minute in our case. Next time the NFS is mounted, it will contain the updated directory tree.
6.17. CentOS VM setup (Exercise)
Make sure CentOS7 VM is down, then clone it into a new VM, centmaster:
virsh list
virsh shutdown CentOS7
virt-clone  -o CentOS7 -n centmaster -f /home/hostadm/KVM/centmaster.qcow2
Start centmaster VM, and login to the console:
virsh start centmaster
virsh console centmaster
Correct the VM hostname by editing file /etc/hostname.
Edit file /etc/sysconfig/network-scripts/ifcfg-eth0 and put the following settings for DHCP configuration:
NETWORKING=yes
DEVICE=eth0
TYPE=Ethernet
ONBOOT=yes
BOOTPROTO=dhcp
Reboot centmaster VM.
Get the IP address of centmaster:
ifconfig eth0
6.18. Export NFS from master to centmaster (exercise)
On master VM, make sure you can ping centmaster:
ping -c 3 centmaster
If the ping doesn’t respond, include the IP address of centmaster in file /etc/hosts.
Export directory /NFS/home to centmaster by following two steps below: Edit file /etc/exports on master VM and add the line below
/NFS/home centmaster(rw)
Run command
exportfs -a
Verify the exports by running command showmount on master VM:
showmount -e master
6.19. Setting NFS client on CentOS (Exercise)
On centmaster VM, install the packages for NFS services:
yum install nfs-utils
Verify that centmaster can reach out to the RPC on master:
rpcinfo -p master
Verify that centmaster can get the exported NFS directory from master:
showmount -e master
On centmaster VM, create the mount point:
mkdir -p /NFS/home
Mount the NFS directory from master VM.
mount master:/NFS/home /NFS/home
Verify that the directory is mounted:
df -h
Unmount the directory:
umount /NFS/home