12. Security topics. Part 1: password security.
Outline of the password security:
Vectors of attack review
Passwords and encryption types
Password cracking exercise
Pluggable Authentication Module (PAM)
Password complexity and policy settings
Two factor authentication (TFA)
12.1. Examples of how systems get compromised.
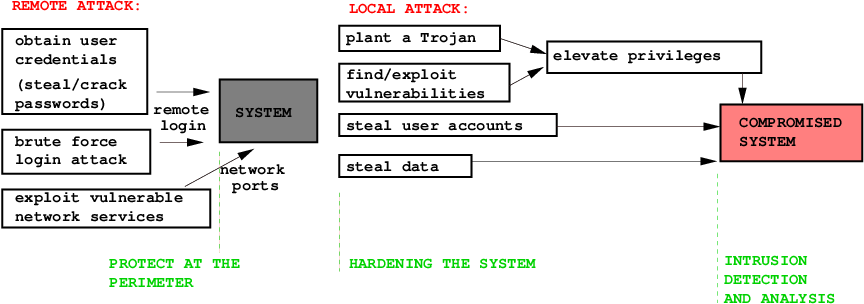
Cracked, stollen and sniffed passwords
SSH client with a sniffer on a multi-user system: reads user name, password and the destination host.
SSH brute force attack guesses user credentials.
Accounts with empty passwords and root privileges
World writable files and directories can be used for planting trojans.
SETUID and SETGID executables
Trojans
Stack overflow attacks on vulnerable services
Worms
12.2. Linux passwords.
On a local system, passwords are stored in file /etc/shadow:
mike:$6$A0NKorlZ$l3YhLlm/Y1n2BW0YBiryNl5cS6vx5k.4j4LE/vb5FUOnD.uVXkiUA1kPSHLo5/6q5MzEJTal1OY1OiE4ReSpK0:17317:0:99999:7:::
The second field consits of 3 parts: the hashing algorithm, \(6\), the salt \(A0NKorlZ\), and the hashing function, crypt, value of (password,salt) parameters,
l3YhLlm/Y1n2BW0YBiryNl5cS6vx5k.4j4LE/vb5FUOnD.uVXkiUA1kPSHLo5/6q5MzEJTal1OY1OiE4ReSpK0
The password hash is generated by function crypt. From the output of man crypt we see the hash structure components:
$id$salt$encrypted
       The following values of id are supported:

              ID  | Method
              -----------------------------------------------------
              1   | MD5
              2a  | Blowfish (not in mainline glibc; added in some
                  | Linux distributions)
              5   | SHA-256 (since glibc 2.7)
              6   | SHA-512 (since glibc 2.7)
So $5$salt$encrypted is an SHA-256 encoded password and
$6$salt$encrypted is an SHA-512 encoded one.
12.3. MD5 and SHA512 Encryption algorithms.
The crypt algorithms are the one way function. There is no reverse function to derive the original password from its hash.
md5-crypt can be divided into three phases. Initialization, loop, and finalization:
        1. Generate a simple md5 hash based on the salt and password
        2. Loop 1000 times, calculating a new md5 hash based on the previous hash concatenated with alternating the password and the salt.
        3. Use a special base64 encoding on the final hash to create the password hash string
sha512-crypt allows to specify a custom number of rounds, from 1000 to 999999999. the default is 5000.
12.4. mkpasswd installation (Exercise).
Start kvm1, login to the console, and create shell script reset_machine_id.sh in the home directory of hostadm with the following content:
reset_machine_id.sh:
#!/bin/bash
rm -f /etc/machine-id
rm /var/lib/dbus/machine-id
dbus-uuidgen --ensure=/etc/machine-id
dbus-uuidgen --ensure
dhclient -r ens3
Make the script executable:
chmod a+x reset_machine_id.sh
Logout from the console, and shutdown kvm1:
virsh shutdown kvm1
Clone your kvm1 virtual machine into a new VM, cryptvm.
virsh shutdown kvm1
virt-clone -o kvm1 -n cryptvm -f /home/hostadm/KVM/cryptvm.qcow2
Start cryptvm and login to its console:
virsh start cryptvm
virsh console cryptvm
Fix the hostname in /etc/hostname and Reset the machine ID by running the script:
./reset_machine_id.sh
Reboot the VM.
On the desktop, enter the IP address of cryptvm in /etc/hosts file to reslove its host name.
Install whois package on cryptvm:
apt-get install whois
The package contains command mkpasswd. To see what encryption algorithms are supported, run command below:
mkpasswd -m help
12.5. User password with different encryptions (Exercise).
On cryptvm, create user accounts mike1, mike2, mike3, mike4:
useradd -m -s /bin/bash -d /home/mike1 mike1
useradd -m -s /bin/bash -d /home/mike2 mike2
useradd -m -s /bin/bash -d /home/mike3 mike3
useradd -m -s /bin/bash -d /home/mike4 mike4
By using command mkpasswd on cryptvm create passwords for each user with the different encryption algorithm:
mkpasswd --method=des mike1
mkpasswd --method=md5 --salt=b1b2b3b4 mike2
mkpasswd --method=sha-256 --salt=b1b2b3b4 mike3
mkpasswd --method=sha-512 --salt=b1b2b3b4 mike4
Copy the hashes into the user accounts on cryptvm.
To see thelast 4 the entries in /etc/shadow
tail -4 /etc/shadow
They should look as follows:
mike1:WsjrhMNZ2uDQ6:17343:0:99999:7:::
mike2:$1$b1b2b3b4$.DXYwTXqggiphS7Cf/1Xs/:17343:0:99999:7:::
mike3:$5$b1b2b3b4$KR9Cw68GDJqOh8AHoYjzBj0NPBfZqSrK6Ys2Ylw5OL0:17343:0:99999:7:::
mike4:$6$b1b2b3b4$03/.yg7J/ZdMZk8HdieyVOYKM6S9vToVo1QZyT5j1MZ3PDl4uISxwb.Cq9lHDdgxZHpUxumfe.fYSrDb8m9Al.:17343:0:99999:7:::
From the desktop, ssh to cryptvm as users mike1, mike2, mike3, mike4 and make sure their passwords work:
ssh mike1@cryptvm
ssh mike2@cryptvm
ssh mike3@cryptvm
ssh mike4@cryptvm
12.6. Cracking passwords with John the Ripper (Exercise).
On cryptvm, install John the Ripper:
apt-get install john
mkdir john
cd john
Copy the hash entries from /etc/shadow:
tail -4 /etc/shadow > passwd.txt
Crack DES passwords (default):
john passwd.txt        #this cracks password
john --show passwd.txt #this shows  the cracked passwords
Crack MD5 passwords:
john --format=md5crypt passwd.txt      #this cracks password
john --show passwd.txt                 #this shows  the cracked passwords
They should look as follows:
mike1:mike1:17343:0:99999:7:::
mike2:mike2:17343:0:99999:7:::
2 password hashes cracked, 2 left
Note, John the Ripper can’t handle advanced encryption algorithms, SHA-256 and SHA-512.
12.7. Pluggable Authentication Module (PAM).
All the PAM configuration files are located in directory /etc/pam.d.
Every application or service that uses PAM has its own config file there. Their entries consist of four columns:
module type |
control flag |
module path |
argument |
|---|
Module types
auth |
account |
session |
password |
|---|---|---|---|
Authenticates a user |
Restricts or permits access when certain conditions on the account are met |
Some operations on the user environment at login and/or loogout |
Needed when updating a user password |
The control flag specifies how PAM reacts on success or failure of the module.
required |
requisite |
sufficient |
optional |
|---|---|---|---|
Success of the module is required. If fails, doesn’t exit until the other modules in the list are checked |
Similar to required, but exits if the module fails |
Exits if the module succeds |
the success or failure of this module is only important if it is the only module in the stack associated with this service type. |
Example
/etc/pam.d/sshd:
/etc/pam.d/sshd:
#Set correct type settings
auth       required     pam_env.so envfile=/etc/default/locale
# Standard Un*x authentication.
@include common-auth

# Disallow non-root logins when /etc/nologin exists.
account    required     pam_nologin.so
# Standard Un*x authorization.
@include common-account

# Standard Un*x session setup and teardown.
@include common-session
# Print the message of the day upon successful login.
session    optional     pam_motd.so # [1]
# Print the status of the user's mailbox upon successful login.
session    optional     pam_mail.so standard noenv # [1]
# Set up user limits from /etc/security/limits.conf.
session    required     pam_limits.so

# Standard Un*x password updating.
@include common-password
12.8. Two factor authentication (Exercise).
Using even a relatively strong password on a critical system may not be sufficient, especially, for remote access. Two-factor authentication, configurable through PAM, is desirable.
Install the prerequisite packages to build the Google authenticator:
apt-get install make gcc libpam0g-dev autoconf libtool git
Download the source code:
git clone https://github.com/google/google-authenticator-libpam
Compile the PAM module:
cd google-authenticator-libpam
./bootstrap.sh
./configure
make
sudo make install
The entry in the SSH PAM config file, /etc/pam.d/sshd, should contain the full path to the google authenticator library, /usr/local/lib/security/pam_google_authenticator.so, namely:
/etc/pam.d/sshd:
auth required /usr/local/lib/security/pam_google_authenticator.so
Edit file /etc/ssh/sshd_config and set
ChallengeResponseAuthentication yes
Restart ssh:
systemctl restart ssh
Configure the google authenticator by running command as user hostadm:
google-authenticator
Do you want authentication tokens to be time-based (y/n) y

Your new secret key is: 5G3KY2FPHDHF2GGY7MLQP6I4PA  - save the key. It will be needed for configuring the App.

Do you want me to update your "/home/hostadm/.google_authenticator" file? (y/n) y

Do you want to disallow multiple uses of the same authentication token?  (y/n) y

This will permit for a time skew of up to 4 minutes between client and server. Do you want to do so? (y/n) y

Do you want to enable rate-limiting? (y/n) n
The ownership of file .google_authenticator in the home directory of hostadm should be hostadm:
sudo chown hostadm:hostadm /home/hostadm/.google_authenticator
Install Google Authenticator plugin in the Firefox on your desktop by navigating at
https://addons.mozilla.org/en-US/firefox/addon/auth-helper/
Configure the plugin: click on Edit, +, Secret, then use the secret key that you got during the configuration of the google authenticator on the VM.
Try ssh to cryptvm from the desktop as hostadm and use both the password and the code shown up in the applet.
12.9. References on password security
Password hashing with MD5-crypt in relation to MD5
Implementation of SHA512-crypt vs MD5-crypt
How are passwords stored in Linux (Understanding hashing with shadow utils)
How To Set Password Policies In Linux
How To Force Users To Use Strong Passwords In Debian, Ubuntu
Securing SSH with two factor authentication using Google Authenticator