
7. Service Management, Environment Files, and Job Scheduling#
Bootup sequence
Systemd initialization
Starting and stopping services
Unit files
Environment files
Scheduling jobs with
atandcron
7.1. Linux Bootup and Login Sequence#
The BIOS initiates, checks system peripherals, and identifies a bootable storage device.
The system loads the first sector into RAM and executes it, displaying the GRUB bootloader prompt.
The bootloader loads the Linux kernel from the sector list (
/boot/vmlinuz-7.0.0-15-generic) and places the initial RAM disk image (initrd) into RAM.The kernel executes and unpacks its compressed image.
The kernel initializes underlying hardware components.
The kernel mounts the root (
/) file system (for example,/dev/sda1).The kernel executes
init(Systemd) as Process ID 1 (PID 1).Systemd initializes the units specified within the default target, which in turn starts core system services.
Among these initialized services,
agettyprograms launch on each virtual terminal, initializing the login process.The
loginprogram requests a username and password, validating credentials against/etc/passwd, Network Information Service (NIS) maps, or Lightweight Directory Access Protocol (LDAP), depending on Pluggable Authentication Modules (PAM) settings.Upon successful authentication,
loginspawns an interactive user shell.The shell executes appropriate startup scripts (
.profileforshandksh;.bash_profilefor Bash;.cshrcand.loginforcshandtcsh).The shell outputs an interactive command prompt and awaits user input.
7.2. Virtual Machine Setup for Startup Scripts (Exercise)#
Clone the template virtual machine kvm1 to a new Network File System (NFS) server VM host named run01 by executing the commands below:
virsh shutdown kvm1
virt-clone -o kvm1 -n run01 -f /home/hostadm/KVM/run01.qcow2
Verify that the new VM appears in the guest list, boot it up, and connect to its console interface:
virsh list --all
virsh start run01
virsh console run01
Update the system hostname by replacing kvm1 with run01 inside the /etc/hostname file.
Reset the unique machine identifier by running the helper script located on kvm3:
./vm_id_reset.sh
Reboot the virtual machine to apply changes:
reboot
Following the reboot cycle, the virtual machine should load successfully with the updated hostname.
7.3. Systemd as the Parent of All Processes (Exercise)#
Systemd serves as the primordial parent process for all user-space tasks on modern Linux systems. Executed directly by the kernel, it is responsible for launching background services and adopting orphaned processes whose original parent tasks have terminated, ensuring proper process resource reaping.
Access the virtual machine console:
virsh console run01
Install the psmisc package and execute the pstree command to visualize the active process hierarchy:
sudo -s
apt install psmisc
pstree
Output:
systemd─┬─ModemManager───3*[{ModemManager}]
        ├─accounts-daemon───3*[{accounts-daemon}]
        ├─agetty
        ├─atd
        ├─cron
        ├─dbus-daemon
        ├─login───bash───pstree
        ├─multipathd───6*[{multipathd}]
        ├─networkd-dispat
        ├─polkitd───3*[{polkitd}]
        ├─rsyslogd───3*[{rsyslogd}]
        ├─sshd
        ├─systemd───(sd-pam)
        ├─systemd-hostnam
        ├─systemd-journal
        ├─systemd-logind
        ├─systemd-network
        ├─systemd-resolve
        ├─systemd-timesyn───{systemd-timesyn}
        ├─systemd-udevd───10*[systemd-udevd]
        ├─udisksd───5*[{udisksd}]
        └─unattended-upgr───{unattended-upgr}
To display the process tree with corresponding Process IDs (PIDs) in an untruncated format, execute:
pstree -p -l
The /usr/bin/pstree utility is provided by the psmisc package.
7.4. Systemd in Service Startup#
+-------------------------------------------------------------+
|                     Systemd Initialization                  |
|          (Reads Unit Files & Resolves Dependencies)         |
+------------------------------+------------------------------+
                               |
                               v
+-------------------------------------------------------------+
|                    Target Units Activation                  |
|                 (Multi-User / Graphical Target)             |
+------------------------------+------------------------------+
                               |
                               v
+-------------------------------------------------------------+
|                  Service Daemons & Daemons                  |
|                (Network, SSH, Cron, Agetty)                 |
+-------------------------------------------------------------+
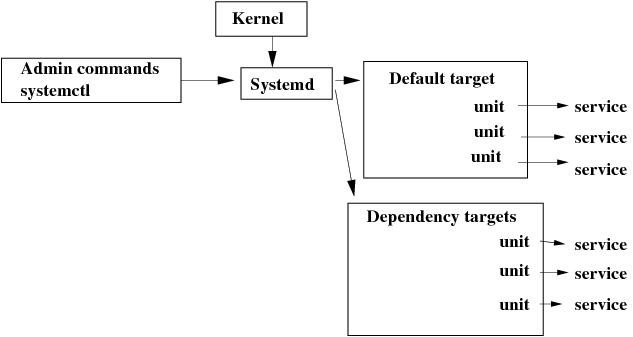
Accessible Image Description:
Overview: This diagram illustrates the structural hierarchy of the Systemd service management and startup architecture.
Setup: The flowchart maps out how Systemd reads configuration unit files, resolves inter-service dependencies, initializes target environments, and launches active daemons.
Key Takeaways: Systemd manages services in an event-driven, parallelized manner to accelerate boot times compared to legacy sequential initialization scripts.
For technical reference details, consult the manual pages:
man init
man systemd
man systemctl
7.5. Administrative Commands to Start and Stop Services (Exercises)#
Systemd-driven services are standard across Ubuntu 18.04, Red Hat Enterprise Linux 7, and newer distributions.
The systemctl utility interfaces directly with the Systemd manager. To list all services currently registered with Systemd, execute:
systemctl list-units --type service
To stop the cron background service, run:
systemctl stop cron
To verify the current operational status of the service:
systemctl status cron
To start the service and immediately inspect its state:
systemctl start cron
systemctl status cron
You can filter service states using targeted list commands:
Active services:
systemctl list-units --type service --state=active
Running services:
systemctl list-units --type service --state=running
Exited services:
systemctl list-units --type service --state=exited
Failed services:
systemctl list-units --type service --state=failed
To view services configured to start automatically at boot (enabled units):
systemctl list-unit-files --type=service --state=enabled
7.6. Legacy System V Services#
Legacy System V initialization scripts were historically used across all Unix-like distributions. Modern distributions retain them within Systemd for backward compatibility.
System V non-event-driven startup scripts reside in the /etc/init.d directory. For example, to stop, start, and query the status of the CUPS printing service, use:
apt install cups
/etc/init.d/cups stop
/etc/init.d/cups start
/etc/init.d/cups status
This is functionally equivalent to using the wrapper utility:
service cups stop
service cups start
service cups status
7.7. System Run Levels (Legacy System V)#
Traditional UNIX environments relied on numbered run levels managed by the init process. Upon boot, init reads the /etc/inittab configuration file and executes initialization scripts associated with the designated default run level. If /etc/inittab is absent, the default run level defaults to 2.
Unix environments define 7 standard run levels (0 through 6), though up to 10 levels (0–9) are technically configurable.
7.7.1. Ubuntu and Debian Run Level Conventions:#
Runlevel 0: System halt and power off.
Runlevel 1: Single-user administrative maintenance mode.
Runlevels 2–5: Multi-user operation modes.
Runlevel 6: System reboot.
7.7.2. Red Hat Enterprise Linux Run Level Conventions:#
Runlevel 0: Halt.
Runlevel 1: Single-user mode.
Runlevel 2: Multi-user mode without network file systems (identical to level 3 if networking is unconfigured).
Runlevel 3: Full multi-user text mode with networking.
Runlevel 4: Unused / user-definable.
Runlevel 5: Multi-user graphical environment (X11).
Runlevel 6: Reboot.
7.8. Comparison of SysV Run Levels with Systemd Targets#
Runlevel |
Target Units |
Description |
|---|---|---|
0 |
|
Shut down and power off the system. |
1 |
|
Initialize a single-user rescue shell environment. |
2 |
|
Set up a non-graphical multi-user system. |
3 |
|
Set up a non-graphical multi-user system. |
4 |
|
Set up a non-graphical multi-user system. |
5 |
|
Set up a graphical multi-user environment. |
6 |
|
Shut down and restart the system. |
7.9. Working with Systemd Targets (Exercises)#
Query the default boot target:
systemctl get-default
List all currently loaded target units:
systemctl list-units --type target
Modify the default startup target:
systemctl set-default multi-user.target
Reboot the system, then verify your changes:
systemctl get-default
systemctl list-units --type target
Inspect the active status of specific targets:
systemctl status multi-user.target
systemctl status graphical.target
Switch the active target dynamically at runtime:
systemctl isolate graphical.target
Verify target units and their operational status:
systemctl list-units --type target
systemctl status multi-user.target
systemctl status graphical.target
You can inspect target dependencies using the systemctl list-dependencies command. For instance, to examine dependencies for the graphical target:
systemctl list-dependencies graphical.target
To filter the output and display only subordinate target units:
systemctl list-dependencies graphical.target | grep target
The Rescue target provides a specialized environment for system recovery with a minimal set of running services. Administrative access requires root privileges.
Set a secure password for the root account:
sudo -s
passwd
Switch dynamically into Rescue Mode:
systemctl rescue
Verify active target units:
systemctl list-units --type target
To switch to Emergency Mode (minimal kernel mounting):
systemctl emergency
Check the active target units:
systemctl list-units --type target
Run pstree to review the reduced set of active processes.
7.10. Adding a Service to Systemd Startup (Exercise)#
Create a custom shell script named test.sh in the /home/hostadm directory:
File content:
#!/bin/bash
echo "current date/time is $(/bin/date)" >> /home/hostadm/timecheck.txt
Grant executable permissions to the script:
chmod 755 /home/hostadm/test.sh
Create a corresponding systemd unit service file named test.service in the /lib/systemd/system directory:
File content:
[Unit]
Description=test startup

[Service]
Type=simple
ExecStart=/home/hostadm/test.sh

[Install]
WantedBy=default.target
Register and enable the new service within Systemd:
systemctl daemon-reload
systemctl enable test
Start the service and review its execution status:
systemctl start test
systemctl status test
Verify that the target output file /home/hostadm/timecheck.txt has been updated. Reboot the virtual machine and verify persistence:
systemctl status test
Check the contents of /home/hostadm/timecheck.txt to confirm successful execution during boot.
7.11. Adding a Stop Script to a Unit (Exercise)#
In the /home/hostadm directory, create a companion shutdown script named stop.sh:
Script file:
#!/bin/bash
echo STOP >> /home/hostadm/timecheck.txt
Make the shutdown script executable:
chmod 755 /home/hostadm/stop.sh
Modify the existing test.service unit file in /lib/systemd/system by adding two directives to the [Service] block:
test.service:
[Unit]
Description=test startup

[Service]
Type=simple
ExecStart=/home/hostadm/test.sh
RemainAfterExit=true
ExecStop=/home/hostadm/stop.sh

[Install]
WantedBy=default.target
Reload the Systemd manager configuration:
systemctl daemon-reload
Stop the service and query its operational status:
systemctl stop test
systemctl status test
Verify that /home/hostadm/timecheck.txt now includes the “STOP” entry generated by stop.sh.
7.12. User Settings at Login#
When a user logs in, the getty process spawns an interactive shell environment.
For the standard Bourne-again shell (/bin/bash), the system evaluates initialization scripts in the following sequence:
Configuration File |
Description |
|---|---|
|
System-wide initialization file executed upon login. |
|
Executed automatically after |
|
Evaluated if |
|
Executed if both |
|
Sourced from |
|
Executed automatically upon session logout. |
Environment variables such as PATH can be defined globally in /etc/profile for all users, or locally in ~/.bashrc for individual user accounts.
When a user logs out, control returns to the init process, which respawns a fresh getty instance on the terminal port.
7.13. Login Scripts (Exercise)#
Complete the following exercises on the run01 virtual machine.
User home directories should include .profile and .bashrc configuration scripts. Create a new user account named jerry:
useradd -m -s /bin/bash jerry
passwd jerry
Add an informational entry to user jerry’s .profile file:
File content
echo PROFILE
Add an informational entry to user jerry’s .bashrc file:
File content
echo BASHRC
Log out and log back in as user jerry. Alternatively, switch user contexts directly from the root account:
su - jerry
Observe that PROFILE appears in the login shell prompt.
Start a subshell session:
/bin/bash
Notice that BASHRC outputs to the prompt for the newly spawned interactive subshell.
Terminate the user session and return to the previous user context:
exit
7.14. One-Time Scheduled Jobs: at#
To schedule a command or script to execute once at a specific time, use the at utility followed by the target execution time. For example, to schedule a task for 8:40 AM:
at 0840
Input your desired shell commands and conclude the stream with Ctrl+D (^D).
Time specification examples:
at 1825 Mar 4
at now + 1 minute
at now + 1 hour
at now + 1 day
To schedule the execution of an existing script file:
at -f filename time_to_run
For example:
at -f /home/jerry/script.sh 2030
at -f /home/jerry/script.sh 11am Mar 30
The at command places queued tasks into the spool directory at /var/spool/at/. The background daemon /usr/sbin/atd monitors this directory and executes queued jobs at their designated times.
To inspect the queue of pending scheduled jobs:
atq
To remove a scheduled job from the queue:
atrm <job_number>
7.14.1. Access Control for at:#
If
/etc/at.allowexists, only users listed within it are permitted to useat.If
/etc/at.allowis absent,/etc/at.denyis checked; any user not listed within it is permitted access.If neither file exists, execution rights are restricted exclusively to the superuser (
root).An empty
/etc/at.denyfile permits all system users to use scheduling commands.
7.15. Periodic Scheduled Jobs: cron#
To execute tasks repeatedly at defined intervals, use the cron daemon. The crond daemon evaluates system crontab files in /var/spool/cron, /etc/crontab, and directory /etc/cron.d/ every minute.
Example configuration from /etc/crontab:
Cron file content
SHELL=/bin/sh
PATH=/usr/local/sbin:/usr/local/bin:/sbin:/bin:/usr/sbin:/usr/bin
# m h dom mon dow user  command
17 *    * * *   root    run-parts --report /etc/cron.hourly
25 6    * * *   root    test -x /usr/sbin/anacron || run-parts --report /etc/cron.daily
47 6    * * 0   root    test -x /usr/sbin/anacron || run-parts --report /etc/cron.weekly
52 6    1 * *   root    test -x /usr/sbin/anacron || run-parts --report /etc/cron.monthly
7.15.1. Syntax Format:#
[Minute] [Hour] [Day_of_Month] [Month] [Day_of_Week] [User] [Command]
Minute:
0through59Hour:
0through23Day of Month:
1through31Month:
1through12Day of Week:
0through6(starting with Sunday)
7.15.2. Examples:#
Cron file content:
25 10 * * * root  /root/scheduled.sh   # Executes /root/scheduled.sh daily at 10:25 AM
25 10 * * 6 root  /root/scheduled.sh   # Executes every Saturday at 10:25 AM
*/5 * * * 6 root  /root/scheduled.sh   # Executes every 5 minutes on Saturdays
7.16. Scheduling with at and cron (Exercises)#
Complete the exercises below on the run01 virtual machine.
Install the at utility package:
apt install at
As the hostadm user, create a script named mem.sh to check system memory utilization:
File content
#!/bin/bash
# Checks memory status through cron

of=/home/hostadm/mem.out
dt=$(date)

echo "Memory status (in MB) on $dt:" >> $of
free -m >> $of
echo "------------------" >> $of
Make the script executable:
chmod 755 mem.sh
Queue the script for execution using at:
at -f mem.sh now + 1 minute
Run atq to verify that the job is registered in the queue. After one minute, inspect the newly generated mem.out file and run atq again to confirm completion.
Delete the mem.out output file. Next, append a periodic execution rule to the bottom of /etc/crontab:
File content
*/2 * * * * root /home/hostadm/mem.sh
Verify that the contents of mem.out update automatically every two minutes.